Safer Bathroom Remodels for Effortless Aging in Place
Quick Answer Box
A safer bathroom remodel for aging in place upgrades the space to reduce falls, improve access, and extend independence. Homeowners with basic DIY skills can manage small updates such as grab bar installation or lighting changes, but major plumbing, electrical, or structural work demands licensed professionals. Expect a full remodel to cost between $8,000 and $25,000 based on size and materials. Plan for one to three weeks of work. The project difficulty ranges from moderate to advanced due to safety and code requirements. The main risks include water leaks, falls during construction, and improper installation of safety fixtures.
Step-by-Step Instructions
1. Plan the Layout for Accessibility
Begin by measuring the bathroom dimensions and marking a clear floor space of at least 30 inches by 48 inches for easy movement. Maintain at least 18 inches of clearance from the toilet centerline to any side walls. Allow additional room for a walker or wheelchair if mobility aids are in use.
- Sketch the layout on graph paper to visualize fixture placements.
- Consider turning radii for wheelchairs, which require a five-foot diameter circle.
Check: Verify the ability to move freely without bumping into walls or fixtures.
2. Remove Old Fixtures Safely
Warning: Electrical and water hazards present. Shut off the water supply and power at the main panel. Drain the toilet tank and bowl completely, then remove the unit with assistance from a partner to avoid injury. Disconnect plumbing for the sink and shower, and cap all open supply lines securely to prevent leaks.
- Wear protective gloves and eyewear during removal.
- Dispose of old fixtures according to local regulations.
Check: Confirm no dripping water or exposed wires remain before proceeding.
3. Inspect and Repair Subfloor and Walls
Examine for rot or water damage beneath the old flooring and behind the tub or shower enclosure. Replace any damaged wood subflooring promptly, and install cement backer board specifically rated for wet areas to provide a stable base.
- Use a moisture meter to detect hidden dampness.
- Level the subfloor with self-leveling compound if uneven spots appear.
Check: Ensure the subfloor feels solid and level, with no soft or spongy areas.
4. Install Non-Slip Flooring
Select slip-resistant materials such as vinyl planks with textured surfaces, porcelain tiles with a matte finish, or rubber mats designed for bathrooms. Avoid glossy or polished surfaces that increase slip risk. For tile installations, choose grout lines reinforced for wet environments.
- Spread thinset mortar evenly with a notched trowel for adhesion.
- Press tiles or sheets firmly into place, ensuring tight joints to prevent lifting edges.
- Apply waterproof caulk along corners, baseboards, and expansion joints.
Check: Test the floor for firmness, levelness, and secure footing by walking across it.
5. Upgrade Lighting for Visibility
Electrical Hazard: Disconnect power at the breaker panel before any work begins. Replace existing bulbs with bright, daylight-spectrum LED fixtures that provide at least 200 lumens per square foot. Install task lighting above the vanity for grooming and low-level night lights along the floor perimeter. Select all fixtures rated for damp or wet locations to meet safety standards.
- Position lights to eliminate shadows around the sink and shower.
- Consider motion-sensor options for hands-free activation.
Check: Verify that all lights function and deliver even illumination without harsh glare.
6. Replace the Toilet with a Comfort-Height Model
Choose a toilet featuring a seat height of 17 to 19 inches from the finished floor to minimize strain on knees and hips during use. Elongated bowls offer additional comfort for users with limited mobility.
- Place a new wax ring centered on the closet flange.
- Lower the toilet base carefully onto the mounting bolts, avoiding cracks in the porcelain.
- Tighten the nuts evenly in a cross pattern, then reconnect the water supply line.
Check: Confirm the toilet remains stable without rocking and shows no leaks after multiple flushes.
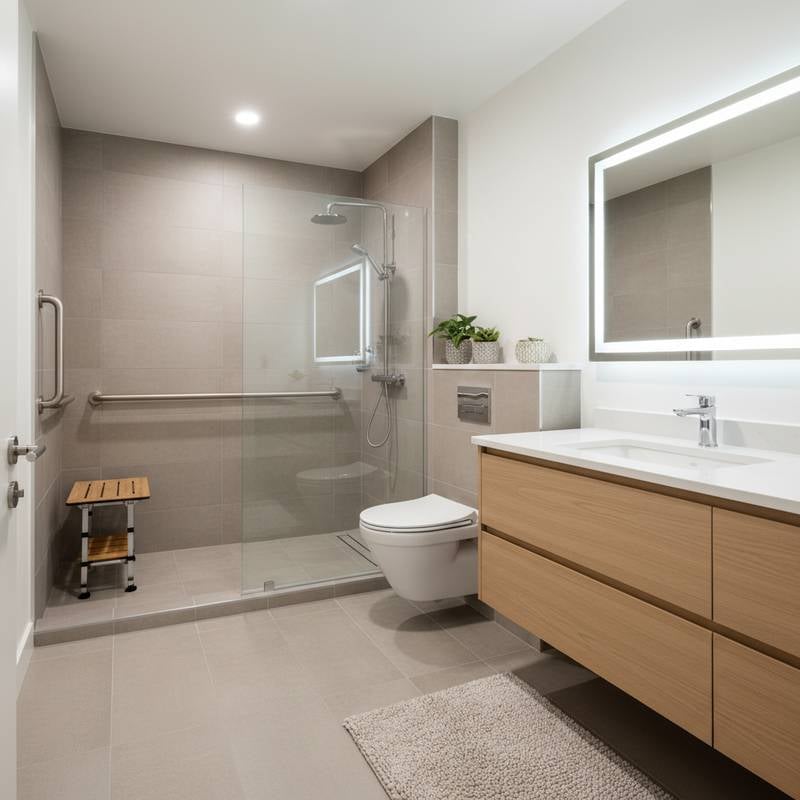
7. Install Grab Bars at Key Points
Warning: Fall risk during and after installation. Locate wall studs using a reliable finder tool before drilling. Position grab bars near the toilet (both sides), inside and outside the shower, and at entry doorways, with heights of 33 to 36 inches from the floor. Select bars rated to support at least 250 pounds, constructed from non-corrosive materials like stainless steel.
- Use toggle bolts or winged anchors for hollow walls if studs are unavailable.
- Install horizontal bars for toilet transfers and vertical ones for shower support.
Check: Pull firmly on each bar to ensure it does not move, flex, or pull away from the wall.
8. Convert to a Walk-In or Curbless Shower
Plumbing and waterproofing alterations require a licensed professional if drain lines or structural framing must be modified. A curbless design eliminates step-over thresholds, reducing trip hazards for seamless entry.
- Slope the shower floor at a rate of one-fourth inch per foot toward the drain for efficient water flow.
- Apply a waterproof membrane or pan liner beneath the tile base.
- Incorporate a built-in bench or fold-down seat positioned at 17 to 19 inches high for seated showering.
Check: Run water to confirm full drainage without pooling in low spots.
9. Install Lever-Handle Faucets and Controls
Opt for lever-style handles that accommodate limited grip strength, or touchless models activated by sensors for added convenience. Single-handle designs simplify temperature and flow adjustments.
- Isolate the water supply before disassembly.
- Remove outdated handles and valves, cleaning the mounting surfaces.
- Secure new fixtures with plumber's tape on threads to achieve watertight connections.
Check: Test water flow for smoothness and verify easy temperature control without excessive force.
10. Add Storage at Accessible Heights
Position shelves or cabinets at heights between 32 and 48 inches from the floor to facilitate reach without strain. Favor shallow designs and pull-out drawers over deep or overhead storage to enhance usability.
- Use adjustable shelving systems for future customization.
- Label bins for quick identification of essentials like medications or toiletries.
Check: Reach for all stored items without excessive stretching, bending, or stepping on unstable surfaces.
11. Improve Ventilation
Upgrade to an exhaust fan with a capacity of at least one cubic foot per minute per square foot of bathroom area, featuring quiet operation below three sones. Effective ventilation prevents moisture accumulation that leads to slippery floors and mold growth.
- Position the fan near the shower or tub for optimal steam capture.
- Connect to a timer or humidity sensor for automatic activation.
Check: Operate the fan during a hot shower and confirm it clears humidity within 15 minutes.
12. Test All Fixtures and Surfaces
Activate water flow in every fixture, inspecting for leaks, loose connections, or unstable components. Walk through the entire space multiple times to evaluate pathways and footing stability.
- Simulate daily routines like entering the shower or using the toilet.
- Check door swings to ensure they do not obstruct clear paths.
Check: The bathroom must feel secure and navigable, with no hazards impeding movement.
Quality Checks and Troubleshooting
Common Failure Points
- Loose grab bars: Reinforce by using longer screws anchored into studs or installing plywood backing plates behind drywall.
- Leaky toilet seals: Lift and re-seat the unit, replacing the wax ring if damage appears.
- Uneven flooring: Identify low areas with a straightedge, then sand or apply patching compound before re-tiling.
- Poor drainage: Measure the floor slope with a level and clear debris from the drain trap.
Simple Fixes
- Apply silicone caulk formulated for wet areas to seal gaps around fixtures and baseboards.
- Swap out any non-functional bulbs with LED versions rated for moist environments.
- Secure loose handles or fixtures by tightening with an adjustable wrench matched to the component size.
When to Call a Pro
Thresholds for Professional Help
Engage experts for tasks involving relocation of plumbing lines or drains, addition of new electrical outlets or circuits, replacement of structural flooring or subfloor, or remediation of potential mold, lead paint, or asbestos. These elements demand specialized knowledge, tools, and adherence to building codes to avoid safety violations or structural issues.
Typical Cost Ranges
- Minor updates including grab bars and faucet replacements: $500 to $1,500
- Moderate remodel encompassing flooring and lighting improvements: $5,000 to $10,000
- Full accessible remodel featuring shower conversions and layout redesigns: $12,000 to $25,000
Vetting a Contractor
Confirm the contractor holds a current license and carries adequate insurance coverage. Request references from previous accessibility-focused projects and review completed work. Obtain a detailed written estimate outlining scope, timelines, and payment schedules. Inquire about warranty coverage for both labor and materials to protect the investment.
Reliable professionals adhere to accessibility standards and select fixtures engineered for long-term support in aging-in-place environments.
Maintaining Your Investment
Preserve the longevity of the accessible bathroom through diligent moisture management, regular fixture testing, and prompt attention to minor wear. Control humidity with consistent fan use and periodic cleaning to prevent slip hazards from residue buildup. As mobility evolves, incorporate adaptive features like reinforced hardware or additional support elements without necessitating a complete overhaul.
Durable materials and intentional design choices enable the space to evolve alongside changing needs, fostering sustained independence while preserving aesthetic appeal and daily comfort.


