2026 ADU Costs Uncovered: Permits and ROI Insights
Quick Answer Box
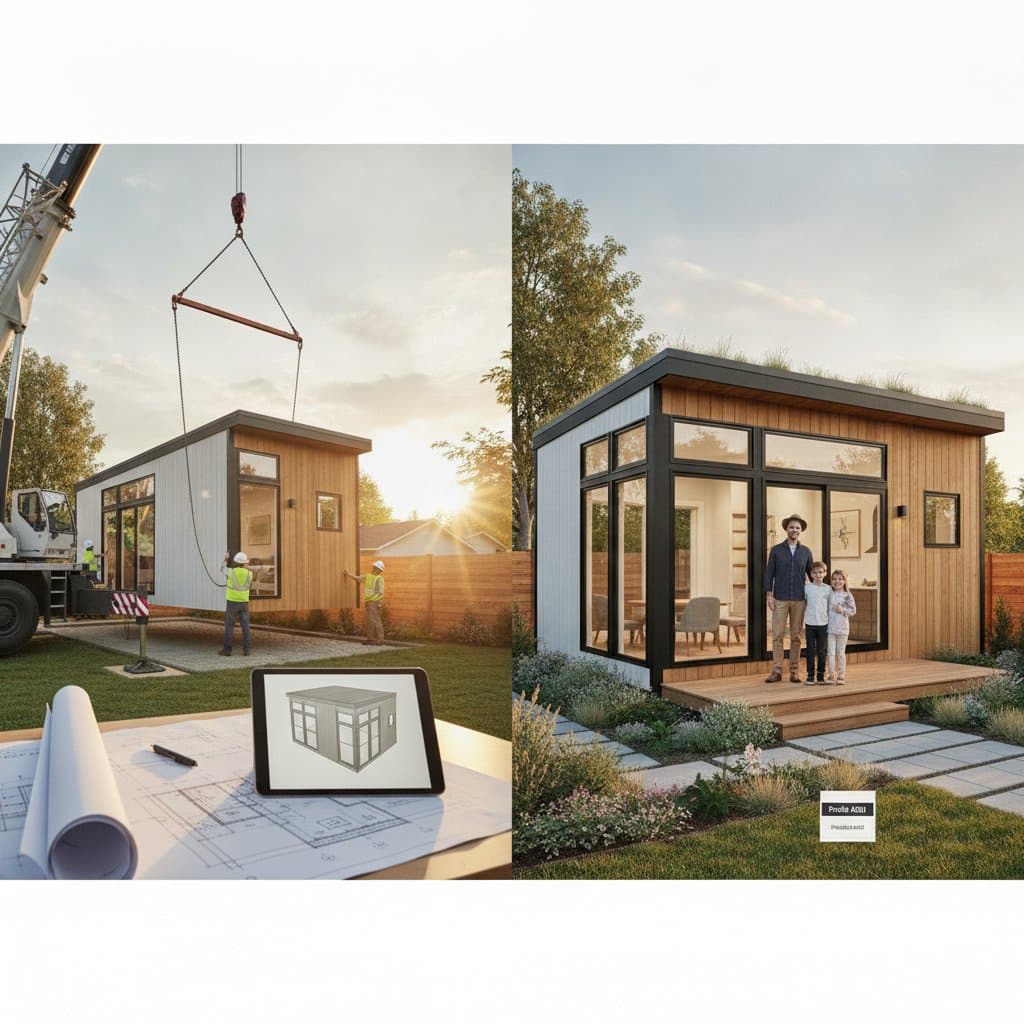
An Accessory Dwelling Unit provides additional living space or generates rental income without the need to purchase new property. For a small detached unit, expect total costs to range from $180,000 to $350,000, influenced by factors such as unit size, material finishes, and site-specific conditions. Permit fees typically add $5,000 to $20,000 to the budget. Projects generally span six to twelve months from start to completion. DIY attempts present advanced difficulty levels, while experienced builders face moderate challenges. Key risks include ensuring code compliance, maintaining structural integrity, and integrating utilities properly. Engage licensed professionals for all electrical, plumbing, and structural elements to mitigate these concerns.
Step-by-Step Instructions
1. Assess Site and Budget
Inspect your property thoroughly to verify access routes for construction equipment and material deliveries. Measure required setbacks from property boundaries, existing trees, and underground utilities to avoid conflicts.
- Obtain a professional site plan or conduct a land survey if details remain unclear.
- Evaluate terrain slopes or potential drainage problems that may necessitate grading work.
The site requires stable soil conditions, absence of flood hazards, and unobstructed pathways for heavy vehicles.
2. Design the ADU
Collaborate with an architect or designer experienced in local ADU regulations to create compliant blueprints.
- Select from options like detached structures, attached additions, or garage conversions based on your needs.
- Limit the overall footprint to jurisdiction-specific maximums, commonly up to 800 square feet.
- Incorporate energy-efficient windows and high-performance insulation to satisfy building codes.
The final design must align with zoning laws and include adequate fire separation measures where applicable.
3. Get Permits and Approvals
Present your design plans, along with detailed structural drawings, to the local building department for review.
- Provide comprehensive layouts for mechanical, electrical, and plumbing systems.
- Cover plan review fees and any mandatory impact or connection charges.
- Proceed with ground-breaking activities only after receiving official written approval.
Stamped plans must remain available on-site throughout the inspection process.
4. Prepare and Pour the Foundation
Warning: Excavation and concrete operations carry risks of falls and crushing injuries. Equip yourself with sturdy boots, protective gloves, and a hard hat at all times.
- Dig to the specified depth, usually between 12 and 24 inches, following engineered specifications.
- Set up form boards and position rebar according to the provided structural details.
- Arrange for a footing inspection prior to the pour.
- Pour the concrete mixture and permit it to cure fully for a minimum of seven days.
Verify that the foundation surface remains level, perfectly square, and devoid of cracks.
5. Frame the Structure
Warning: Raising wall sections and installing roof trusses involves heavy lifting that can lead to injuries. Employ mechanical lifting aids and enlist sufficient assistance.
- Construct walls using 2x4 or 2x6 studs spaced 16 inches apart on center.
- Apply sheathing to the exterior and position roof trusses securely.
- Integrate windows and doors into the framework as designed.
Ensure all walls stand plumb and that the framing precisely matches the approved plans.
6. Rough-In Utilities
Contract licensed specialists to handle plumbing, electrical, and HVAC installations.
- Lay out drain, supply, and vent piping for the plumbing system.
- Route electrical circuits through conduit or protected cable, complete with appropriate circuit breakers.
- Install ductwork, ventilation components, or mini-split units to provide reliable heating and cooling.
Secure approval from inspectors for each rough-in stage prior to enclosing with drywall.
7. Insulate and Drywall
- Place insulation materials to achieve the R-value mandated by your region's climate standards.
- Secure drywall panels, tape the joints meticulously, and apply layers of joint compound.
- Sand surfaces to a smooth finish and apply primer coats evenly.
Confirm that all surfaces appear uniform and show no signs of excess moisture.
8. Finish Interior and Exterior
- Apply paint to walls, ceilings, and trim for a cohesive appearance.
- Install durable flooring, functional cabinetry, and essential fixtures.
- Clad the exterior with siding, lay roofing shingles, and attach gutters for water management.
All finishing elements must adhere to manufacturer guidelines and local building codes.
9. Final Inspection and Occupancy
Coordinate final inspections covering the building envelope, electrical, plumbing, and mechanical systems.
- Address and resolve any deficiencies identified during the reviews.
- Secure the certificate of occupancy prior to occupying or renting the unit.
The completed structure must demonstrate full safety, operational functionality, and complete code adherence.
Quality Checks and Troubleshooting
Common Issues
- Foundation cracks: Minor hairline fissures may develop during the curing process. Apply epoxy sealant to prevent further expansion.
- Uneven floors: Investigate causes such as incorrect joist placement or soil settling. Professionals can remedy these with shims or self-leveling compounds.
- Moisture in walls: Ensure gutters channel water away from the foundation and that vapor barriers remain intact and undamaged.
- Electrical flicker: Intermittent lights often stem from loose wire connections. De-energize the circuit immediately and summon a qualified electrician.
Simple Fixes
- Tighten hinge screws to resolve doors that stick or bind.
- Perform touch-up painting following the final cleanup to maintain a pristine finish.
- Renew caulking around window frames if cracks appear, thereby preventing water infiltration.
When to Call a Pro
Engage certified experts for critical tasks to ensure safety and compliance:
- Electrical wiring: Improper installations risk fires or electrical shocks.
- Gas plumbing: Certified plumbers alone may handle gas line installations or repairs.
- Structural framing: Load-bearing alterations demand adherence to engineering specifications.
- Foundation repair: Assess cracks exceeding 1/4 inch in width through professional evaluation.
Skilled trade labor rates typically fall between $60 and $120 per hour. Request documentation of insurance coverage and insist on detailed written contracts. Validate contractor licenses via your state's official verification portal.
Permit Insights
Required Permits
Local authorities generally mandate distinct permits for:
- Building construction
- Electrical systems
- Plumbing installations
- Mechanical systems (HVAC)
- Grading or drainage modifications if site alterations occur
Additional fire department evaluations may apply for units positioned near property lines. Certain municipalities impose impact fees or utility hookup charges. Request a comprehensive fee schedule upfront to anticipate all expenses.
Inspection Process
Anticipate these standard inspection milestones:
- Footing and foundation review prior to concrete placement
- Framing examination before enclosing walls
- Rough-in verifications for utilities
- Insulation compliance check
- Comprehensive final building inspection
Maintain your permit documentation readily available for inspector access. Unpassed inspections result in project delays and potential additional reinspection charges.
Pro Tips for Success
- Initiate planning well in advance to obtain permits ahead of peak construction periods.
- Allocate a contingency fund equivalent to 10 to 15 percent of the total budget for unforeseen expenses.
- Establish weekly communication protocols with your general contractor and specialized trades.
- Book inspections in advance to prevent bottlenecks in the timeline.
- Label all utility connections clearly to facilitate ongoing maintenance efforts.
- Document each construction phase with photographs for records and insurance purposes.
Realizing Long-Term Value from Your ADU
A thoughtfully executed Accessory Dwelling Unit offers versatile living options, steady rental revenue, and enduring property appreciation. Through meticulous budgeting, adherence to safety protocols, and rigorous permitting processes, your project remains compliant, durable, and positioned for maximum benefit.