Universal Design: Age-Proof Your Home for 2025
Quick Overview
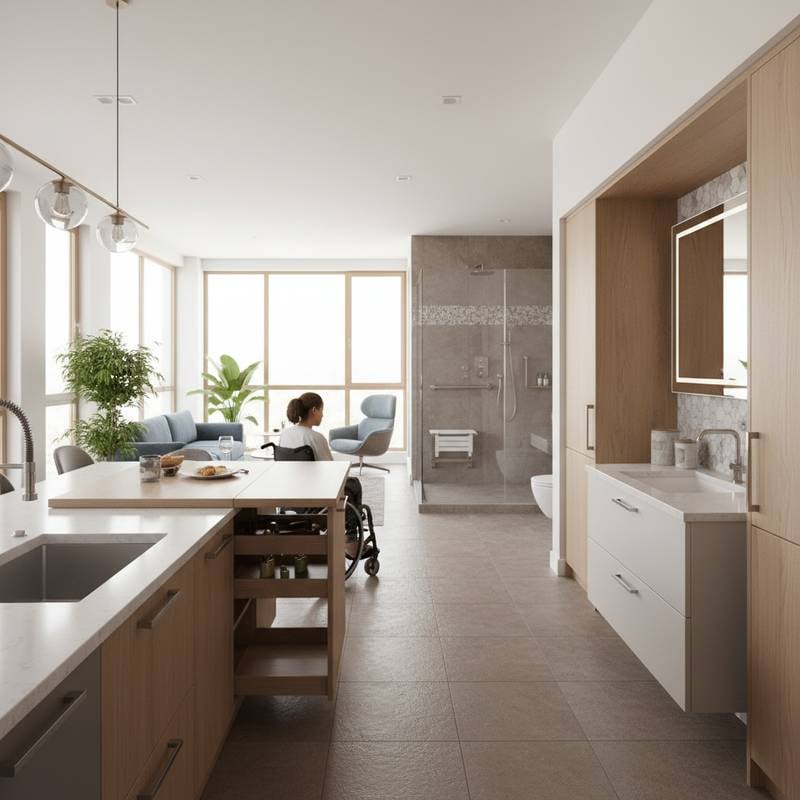
Universal design principles create environments that accommodate people of all ages, sizes, and abilities without the need for specialized adaptations. This approach focuses on safety, ease of use, and comfort in everyday spaces. The following sections detail key features, planning strategies, and implementation options to help you modify your home effectively.
Cost and Time Estimates
Costs for universal design modifications depend on the scope, home size, and location-specific factors such as labor rates and material availability.
- Minor updates, including grab bars, lever handles, and enhanced lighting, range from $500 to $2,500.
- Moderate renovations, such as doorway expansions, flooring replacements, and bathroom updates, typically fall between $8,000 and $20,000.
- Full remodels involving structural alterations, ramps, or complete kitchen overhauls can exceed $25,000 to $50,000.
Labor and materials vary by region, with additional expenses for permits and inspections. Time commitments differ by project type: DIY efforts like installing grab bars often complete in a weekend, while professional work may span several weeks, accounting for approvals and coordination.
Difficulty levels range from moderate for simple installations to advanced for tasks requiring knowledge of building codes and accessibility guidelines.
DIY vs Professional Guidance
Certain modifications suit hands-on homeowners, while others demand expert intervention to ensure safety and compliance.
DIY-friendly tasks include:
- Securing grab bars with appropriate wall anchors.
- Swapping round knobs for lever-style handles.
- Placing non-slip mats or selecting low-pile rugs.
- Upgrading to rocker switches and improving lighting placement.
Professional-required tasks encompass:
- Expanding doorways or altering load-bearing walls.
- Fitting roll-in showers or walk-in tubs.
- Adjusting countertop heights and cabinet configurations.
- Constructing ramps or installing stair lifts.
Cost comparisons highlight savings with DIY: basic material purchases stay under $1,000, whereas professional services begin at $4,000 and scale with complexity. Engaging a licensed contractor guarantees adherence to codes, structural integrity, and effective waterproofing, particularly in moisture-prone areas like bathrooms.
Step-by-Step Instructions
1. Assess Your Current Layout
Conduct a thorough walkthrough of your home to identify navigation challenges. Pay special attention to entry points, bathrooms, kitchens, and hallways. Document issues like narrow doorways, elevated thresholds, or slick surfaces.
Success check: Compile a prioritized list of mobility barriers and convenience obstacles.
2. Plan Entry Access
Incorporate a gentle ramp to replace steps or create a zero-step threshold at the primary entrance. Ensure exterior doors measure at least 36 inches wide to facilitate wheelchair passage. Apply weather-resistant, non-slip materials to porches and pathways.
Success check: Verify that entries support seamless movement for mobility aids without elevation changes or hazards.
3. Improve Lighting and Controls
Install glare-free LED lights in high-traffic zones like hallways, kitchens, and bathrooms for optimal visibility. Position rocker or touch switches between 36 and 42 inches from the floor. Integrate motion-activated sensors for effortless operation.
Success check: Confirm that illumination covers all areas adequately, minimizing the need for awkward reaching or stooping.
4. Modify Doorways and Hallways
Expand interior doors to a minimum of 32 inches in width. Eliminate or bevel thresholds to under 0.5 inches. Opt for pocket or barn doors in confined areas to maximize space.
Success check: Ensure wheelchair or walker access to primary rooms remains unobstructed.
5. Upgrade Bathroom Safety
Mount grab bars adjacent to toilets and within shower enclosures. Convert traditional tubs to curbless or roll-in showers. Incorporate non-slip flooring, handheld showerheads, and sinks with 27 inches of knee space below.
Success check: Test that users can access, shower, and operate fixtures independently and securely.
6. Reconfigure the Kitchen
Reduce select countertop heights to 34 inches to accommodate seated preparation. Install pull-out shelves and drawers in place of fixed cabinets. Choose side-opening ovens, front-control cooktops, anti-scald faucets, and focused task lighting.
Success check: Validate reachability of all cooking and cleanup zones from a seated or standing position.
7. Adjust Flooring and Surfaces
Transition from high-pile carpets to low-profile or hard-surface options. Select slip-resistant choices like textured vinyl or matte tiles. Maintain uniform flooring transitions across rooms to avoid elevation shifts.
Success check: Confirm smooth, stable movement throughout the home without footing disruptions.
8. Upgrade Bedrooms for Accessibility
Provide 36 inches of clearance around the bed for easy navigation. Place outlets and switches at reachable heights. Consider adjustable bed frames to enhance positioning and mobility.
Success check: Ensure nighttime access and movement occur without barriers.
9. Add Smart and Assistive Technology
Deploy voice-controlled systems for lighting and climate regulation. Equip entries with video doorbells and smart locks for convenient, secure access. Integrate fall detection and alert devices for added protection.
Success check: Verify that tech integrations streamline routines and bolster safety with minimal user effort.
Safety Warnings and Tips
Warning: Electrical Hazard
Disconnect power at the breaker panel prior to working on switches or outlets. Employ a voltage tester to verify deactivation.
Caution: Fall Risk
Utilize stable ladders and maintain supervision during installations. Refrain from solitary work in wet or uneven areas.
Caution: Structural Changes
Avoid altering walls or framing until load-bearing elements are assessed. Seek guidance from a licensed contractor or engineer.
Protective gear:
Wear safety glasses and gloves during demolition tasks. Choose footwear with non-slip soles. Use hearing protection with power tools.
Troubleshooting and Quality Checks
Problem: Grab bars wobble post-installation.
Fix: Employ anchors supporting 250 pounds minimum; secure into studs where feasible.
Problem: Widened doors bind on frames.
Fix: Realign hinges or smooth edges to preserve clearance alongside new trim.
Problem: Water accumulates in curbless showers.
Fix: Ensure floor pitch measures at least 0.25 inch per foot toward the drain.
Problem: Illumination appears insufficient.
Fix: Upgrade to higher-wattage bulbs within fixture ratings or broader LED beams.
Quality checks:
- Transitions between doors and floors must glide effortlessly.
- Grab bars withstand full body weight without shifting.
- Lighting illuminates corners uniformly, free of harsh glare.
- Surfaces remain dry and firm under pressure.
Cleanup and Disposal
Follow local regulations for discarding old fixtures, flooring, and debris. Sort materials like metals, tiles, and wood for recycling centers or scheduled pickups. Vacuum dust with a HEPA-filtered unit to safeguard air quality. Clean all surfaces thoroughly before reassembling or repositioning elements.
For plumbing or electrical removals, cap and seal connections securely prior to concluding cleanup.
Maintenance and Lifespan
Routine inspections preserve functionality: examine grab bars and fixtures biannually for loose fittings or rust. Clean non-slip floors frequently to sustain grip. Swap out lighting bulbs to maintain even output and tone. Update smart device software and verify alerts on a monthly basis. Annually review plumbing seals and caulking to avert moisture issues.
Quality implementations endure 15 to 25 years under regular care. Opt for robust options like stainless steel hardware, solid-surface counters, and porcelain tiles to minimize upkeep and replacements.
When to Call a Professional
Engage experts for:
- Structural adjustments to doors or walls.
- Relocating plumbing or electrical systems.
- Building roll-in showers or ramps over 30 inches high.
- Projects necessitating permits or inspections.
Professional service costs:
- Bathroom accessibility remodel: $12,000 to $25,000.
- Ramp construction: $2,500 to $6,000.
- Kitchen renovation: $15,000 to $30,000.
Contractor selection checklist:
- Confirm licensing and insurance.
- Obtain detailed estimates in writing.
- Review references from similar projects.
- Clarify warranty details.
- Verify expertise in universal design.
Professionals align modifications with standards for turning spaces, counter ergonomics, and safe pathways.
Pro Tips for Success
- Anticipate evolving needs by incorporating forward-thinking elements today.
- Select versatile components, such as adjustable shelves and removable aids.
- Integrate accessibility seamlessly with your home's aesthetic.
- Tackle core safety elements like illumination and entry before cosmetic enhancements.
- Recognize that these investments boost marketability and curb future expenses.
Embracing Lifelong Independence Through Universal Design
Universal design fosters autonomy across life's phases, welcoming visitors, supporting recovery from injuries, and enabling family members to age comfortably in place. Thoughtful layouts, resilient materials, and intuitive technology yield spaces that serve diverse users without institutional vibes.
The essence lies in adapting to transitions proactively, avoiding disruptive overhauls down the line. From targeted bathroom enhancements to comprehensive renovations, each step fortifies your home's role as a reliable sanctuary.
FAQ
What is universal design?
Universal design creates environments usable by individuals of varying ages, abilities, and sizes, eliminating the need for custom alterations.
Do I need a permit for accessibility upgrades?
Permits apply to structural, plumbing, or electrical work; consult your local building authority for specifics.
Can universal design look stylish?
Absolutely; contemporary fixtures and materials merge functionality with appealing, modern aesthetics.
How can I make my bathroom safer right away?
Incorporate grab bars, non-slip mats, and enhanced lighting to swiftly mitigate fall risks.
What flooring is best for accessibility?
Low-pile carpets, resilient vinyl, or matte tiles offer stable, hazard-free surfaces.
Does universal design increase home value?
Yes; accessible features broaden buyer appeal and accelerate sales in diverse markets.


