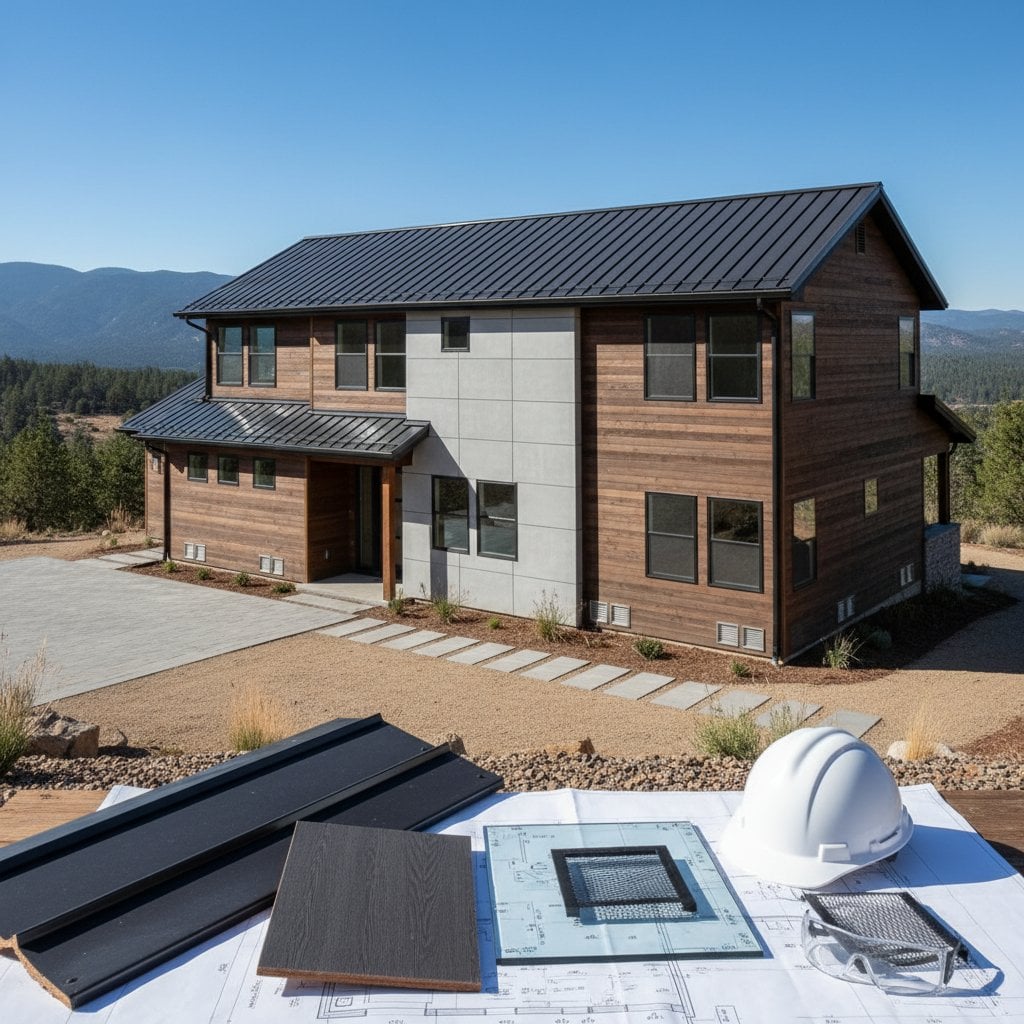
Essential Wildfire-Resistant Materials for Safer 2026 Homes
Wildfires pose an increasing threat to communities, especially in wildland-urban interface zones. As building codes evolve, the 2026 Wildland-Urban Interface standards demand materials that withstand embers, intense heat, and potential flame exposure. Selecting the right options not only meets regulatory requirements but also enhances your home's resilience.
These materials focus on key vulnerabilities: the roof, exterior walls, ventilation systems, and entry points. By prioritizing noncombustible or fire-rated components, homeowners can create a defensible space around their property. This approach reduces ignition risks and supports faster fire suppression efforts.
Quick Overview
Fire-resistant materials form a barrier against wildfire elements like flying embers and radiant heat. Skilled homeowners might manage minor updates, such as installing mesh screens on vents or patching siding seams. However, comprehensive exterior overhauls demand expertise from certified professionals to ensure code compliance and structural integrity.
Budget considerations vary widely. Simple additions like ember-blocking vents start at around $200 for a standard home. Larger projects, including full roof replacements, can range from $5,000 to $20,000 depending on size and material choices. High-risk tasks near electrical systems or elevated surfaces require professional intervention to mitigate hazards.
Step-by-Step Guide to Upgrades
Implementing wildfire protections involves systematic evaluation and replacement. Start with a thorough assessment to identify priorities. Proceed methodically to avoid disruptions and ensure each modification integrates seamlessly.
1. Assess High-Risk Zones
Begin by circling your property on foot, documenting areas prone to fire entry. Pay close attention to untreated wood surfaces, unsecured vents, and overhanging eaves. Use a flashlight to inspect hard-to-reach spots, noting any debris accumulation that could fuel ignition.
Verification Step: Confirm all potential entry points are mapped and accessible for work. This initial survey typically takes 30 to 60 minutes and prevents overlooked vulnerabilities.
2. Retrofit the Roof System
The roof represents the primary defense line, as embers often target this area first. Working at heights introduces significant dangers, so secure a sturdy extension ladder and wear a full-body harness anchored to a stable point.
Carefully remove combustible elements like shake shingles or untreated asphalt. Opt for Class A fire-rated alternatives: durable metal panels, interlocking clay tiles, or fiberglass-reinforced asphalt compositions. These options endure temperatures up to 1,400 degrees Fahrenheit without igniting.
Secure new materials with corrosion-resistant fasteners, overlapping seams by at least six inches to eliminate exposure. Professional roofers recommend underlayment with self-adhering membranes for added waterproofing and fire resistance.
Verification Step: Examine the installation for flush alignments, with no protruding nails or gaps that could trap heat.
3. Strengthen Exterior Wall Assemblies
Traditional wood or vinyl sidings ignite quickly under radiant heat. Strip these away layer by layer, starting from the bottom to maintain stability.
Install fiber-cement siding boards or apply a stucco finish over ignition-resistant sheathing, such as gypsum-based panels. These materials char slowly rather than burn, providing a thermal buffer. Use high-temperature silicone caulk rated for exterior use to seal every joint and edge, preventing ember intrusion.
For textured appeal, choose pre-painted fiber-cement in earth tones that blend with natural surroundings. This upgrade not only boosts fire safety but also improves insulation against daily weather extremes.
Verification Step: Tug gently on panels to ensure secure attachment, and run a finger along seams to confirm complete sealing without voids.
4. Secure Ventilation Openings
Attic and foundation vents serve as pathways for embers if unprotected. Standard plastic or wood screens melt or burn easily during heat events.
Swap them for galvanized steel vents featuring 1/8-inch corrosion-resistant mesh. This size excludes most embers while permitting essential airflow to prevent moisture buildup. Position new units to match existing airflow patterns, avoiding reductions that could lead to condensation issues.
In crawl spaces, combine mesh with noncombustible covers for dual protection. These modifications cost about $10 to $20 per vent and install in under an hour per unit.
Verification Step: Test by shining a light through the mesh; no larger than 1/8-inch openings should appear, and all fixtures must fasten tightly without wobbling.
5. Enclose Roof Overhangs
Open eaves act as chimneys, drawing flames upward. Exposed wooden soffits fuel rapid fire spread along the roofline.
Cover these with aluminum or fiber-cement soffit panels, vented designs if attic cooling requires it. Cut panels to fit precisely using tin snips, then nail or screw into place with fire-rated hardware. This creates a solid barrier that reflects heat away from the structure.
Integrate soffit work with fascia board replacements in noncombustible composites for a unified look. Such enclosures also deter pests and reduce energy loss through drafts.
Verification Step: Scan the underside of the roofline to verify no wooden elements remain visible or accessible.
6. Fortify Windows and Doors
Glazing and frames often fail first in wildfires due to heat shattering. Single-pane glass cracks under thermal stress, allowing embers inside.
Upgrade to dual-pane windows with tempered or fire-rated glass, featuring low-emissivity coatings to block heat transfer. Pair with steel or aluminum frames that resist warping. For doors, select solid-core models with steel exteriors and intumescent seals that expand to block smoke and flames.
Ensure proper fitting by measuring openings twice before ordering. Add weatherstripping around perimeters for airtight closure, enhancing both fire and energy efficiency.
Verification Step: Press against frames to check for tight seals; no light should penetrate when closed, indicating gap-free installation.
Post-Installation Cleanup
Gather all removed materials, including shingles, siding scraps, and old vents, into heavy-duty bags. Transport them to a designated recycling center or landfill that accepts construction waste. Prohibit any on-site burning to comply with local fire regulations.
Sweep roofs, decks, and grounds thoroughly to eliminate stray nails, splinters, or debris. Relocate unused supplies to a dry, locked storage area far from heat sources like grills or workshops. This prevents accidental injuries or secondary fire hazards.
Final Inspections and Fixes
Conduct a walkthrough to scrutinize all new installations. Probe caulk lines and joints for fissures that might widen over time. Address any loose siding panels by re-securing with additional fasteners.
Monitor vent meshes for early rust signs, replacing affected units promptly. After settling periods or weather shifts, recheck window perimeters for emerging gaps and reseal as necessary. These checks ensure long-term performance without costly repairs.
Ongoing Care and Durability
Schedule biannual cleanings for gutters, vents, and roof surfaces to remove leaves and pine needles that harbor embers. For fiber-cement exteriors, refresh paint or sealant every decade to preserve weatherproofing and fire-retardant qualities.
Examine roofing after each wildfire season, focusing on flashing and shingle edges for wear. Metal roofs may dent from hail but retain fire resistance indefinitely with minimal upkeep. Vents demand screen replacements every five years in coastal areas prone to salt corrosion.
Regular attention extends material lifespans: expect 25 to 50 years from quality installations, far outlasting combustible alternatives.
Engaging Professional Services
Certain tasks exceed DIY capabilities, particularly those involving load-bearing changes, wiring adjustments, or large-scale demolitions. Engage contractors licensed in fire-rated construction and WUI compliance.
Siding installations average $12 to $22 per square foot, factoring in labor and materials. Roofing projects fall between $8 and $16 per square foot, influenced by pitch and access. Request multiple bids, confirm credentials through state boards, and review insurance for workmanship guarantees.
Professionals bring tools for precise measurements and often qualify for rebates on compliant upgrades, offsetting expenses.
Common Questions
Which roofing material excels in fire-prone areas? Class A-rated asphalt shingles, clay tiles, and standing-seam metal roofs offer superior ignition resistance and longevity.
How do fiber-cement panels perform in WUI zones? They provide excellent flame spread resistance and thermal insulation, fully aligning with 2026 standards when properly installed.
Is routine maintenance required for ember vents? Annual debris removal ensures optimal function; inspect twice yearly in high-wind regions.
Can existing wood siding receive fireproofing treatments? Fire-retardant sprays offer temporary protection, but replacing with noncombustible options delivers more reliable, permanent safety.
Sustaining Fire-Resilient Protection
Vigilant care transforms your home into a robust sanctuary against wildfire perils. Selecting compliant materials and committing to upkeep minimizes threats while preserving value. This investment safeguards lives, property, and peace of mind amid changing climates.


