The Real 2026 Cost of Aging-in-Place Universal Design
Aging-in-place universal design helps you remain in your home safely and comfortably as your mobility, vision, or physical strength changes. This guide explains what it really costs to upgrade a home for accessibility, what to expect in labor and materials, and how to plan a remodel that meets long-term needs without overspending.
Quick Overview
This article outlines the real costs, timelines, and steps for upgrading a home with universal design features that support aging in place. You will learn what to budget for, when to call a professional, and how to ensure quality and safety throughout the process.
Cost and Time Estimates
Average cost range:
- Minor updates (grab bars, lever handles, lighting): $1,000 to $5,000
- Moderate remodel (bathroom or entry upgrades): $10,000 to $40,000
- Whole-home universal design conversion: $50,000 to $150,000 or more
Key cost factors:
- Scope of work: A full remodel with widened doorways and accessible showers costs far more than installing grab bars.
- Materials: Non-slip flooring, barrier-free showers, and reinforced walls vary by quality and brand.
- Labor rates: Skilled tradespeople, such as plumbers and tile installers, charge more for specialized accessibility work.
- Permits and inspections: Local building codes may require permits for electrical, structural, or plumbing changes.
- Location: Regional labor rates and material availability influence total cost.
Timeline expectations:
- Small updates: 1 to 3 days
- Single-room remodel: 1 to 3 weeks
- Whole-home renovation: 1 to 3 months
Difficulty rating:
- Small updates: Easy
- Bathroom remodel: Moderate
- Whole-home retrofit: Advanced
DIY vs Professional Guidance
Safe and Practical DIY Tasks
You can safely complete basic updates such as:
- Replacing round doorknobs with lever handles
- Adding brighter LED lighting
- Installing peel-and-stick non-slip flooring
- Mounting grab bars into existing wall studs
When to Hire a Professional
Hire a licensed contractor when changes affect structural integrity, plumbing, or electrical systems. Examples include:
- Widening doorways or hallways
- Replacing tubs with curbless showers
- Moving plumbing fixtures
- Adjusting countertop heights
- Installing stair lifts or ramps
Cost Comparison
- DIY projects: $100 to $2,000
- Professional remodels: $10,000 to $75,000+
Hiring a professional ensures proper slope for shower drainage, correct wall reinforcement for grab bars, and compliance with accessibility codes.
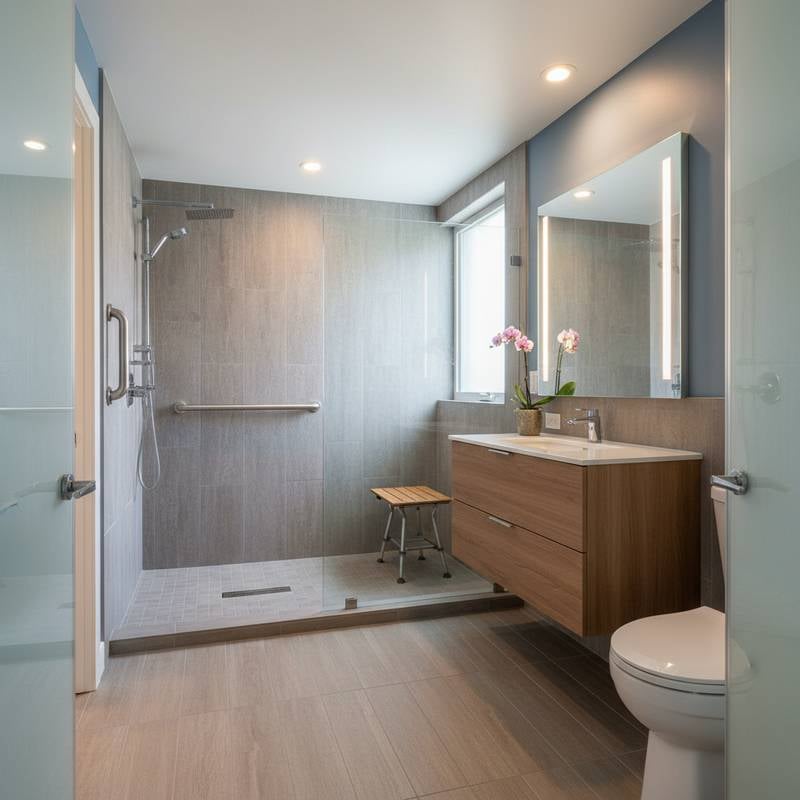
Step-by-Step Instructions: Universal Design Bathroom Remodel
A bathroom upgrade provides the most safety benefits. Follow these steps to create a space that supports independence.
1. Plan the Layout
- Measure the room and sketch traffic paths at least 36 inches wide.
- Include turning space for a wheelchair (5-foot circle recommended).
Check: The layout should allow movement without obstructions.
2. Address Plumbing and Electrical Changes
- Relocate drains or supply lines before flooring and wall work.
- Add outlets at reachable heights (between 15 and 48 inches from the floor).
Warning: Electrical Hazard
Always shut off power at the breaker before modifying outlets.
Check: All outlets must be grounded and tested.
3. Reinforce Walls
- Add blocking behind walls where grab bars, folding seats, or handheld showerheads will mount.
- Use 2x8 or 2x10 lumber between studs.
Check: Each anchor point should support 250 pounds or more.
4. Install a Curbless Shower
- Choose a shower base with a 1/4-inch per foot slope toward the drain.
- Use slip-resistant tile with a coefficient of friction above 0.6.
Caution: Fall Risk
Verify drainage before setting tile to prevent pooling.
Check: The floor should be level outside the shower and slope gently inside it.
5. Choose Accessible Fixtures
- Select a handheld shower on a slide bar for adjustable height.
- Use lever-style faucet handles.
- Mount mirrors and shelves at seated height.
Check: All fixtures should be reachable from a seated or standing position.
6. Improve Lighting and Ventilation
- Use bright, even lighting with minimal glare.
- Install a quiet exhaust fan with humidity control.
Check: No dark corners or shadows remain after installation.
7. Finish with Safety Accessories
- Add textured grab bars near the toilet, shower, and tub.
- Include contrasting edge colors on steps or flooring transitions.
Check: All bars feel secure and surfaces remain dry.
Tools and Materials List
Tools:
- Tape measure
- Level
- Drill and driver set
- Stud finder
- Tile saw
- Safety glasses and gloves
Materials:
- Non-slip tile or vinyl flooring
- Grab bars (lengths from 18 to 36 inches)
- Reinforcement lumber
- Shower pan or linear drain
- LED lighting fixtures
- Lever handles and faucets
- Waterproof backer board and sealant
Safety Warnings and Tips
- Caution: Fall Risk Use non-slip materials and keep floors dry.
- Warning: Electrical Hazard Turn off power before adjusting wiring.
- Caution: Structural Risk Reinforce walls before mounting heavy fixtures.
Wear gloves, safety glasses, and sturdy shoes during all phases of work. Keep pathways clear of debris and cords.
Troubleshooting and Quality Checks
| Problem | Likely Cause | Fix |
|---|---|---|
| Water pooling in shower | Incorrect slope | Regrade tile bed toward drain |
| Grab bar feels loose | Missing wall blocking | Reinstall into reinforced studs |
| Doorway still too narrow | Frame not widened enough | Adjust framing to 36 inches clear width |
| Flickering lights | Loose wiring or poor fixture quality | Tighten connections and test circuit |
Quality checks:
- Floors are level and firm.
- Water drains properly.
- All fixtures operate smoothly.
- Lighting is uniform and glare-free.
Cleanup and Disposal
- Dispose of old fixtures, tile, and drywall at approved waste centers.
- Recycle metal, glass, and cardboard packaging.
- Vacuum dust and wipe surfaces with a damp cloth before use.
- Confirm local regulations for disposal of treated lumber or adhesives.
Maintenance and Lifespan
Inspect grab bars, flooring, and fixtures every six months. Tighten loose hardware and clean non-slip surfaces with mild detergent. LED lighting lasts about a decade under normal use, while properly installed grab bars and tile can last decades with minimal upkeep. Replace worn seals or grout to prevent water intrusion.
When to Call a Professional
Call a professional if you encounter:
- Structural framing changes
- Drain relocation or plumbing reroute
- Electrical rewiring or ventilation upgrades
- Accessibility compliance for resale or inspection
Professional cost ranges:
- Certified aging-in-place contractor: $75 to $150 per hour
- Licensed electrician or plumber: $80 to $200 per hour
- Full-service remodel: $25,000 to $75,000 depending on scope
Contractor Selection Checklist
- Valid license and insurance
- References from similar accessibility projects
- Written estimate with clear scope and materials
- Warranty on workmanship
- Familiarity with local accessibility standards
FAQ Section
How much should I budget for an accessible bathroom remodel?
Expect $10,000 to $40,000 for a full remodel with curbless shower, grab bars, and improved lighting.
Do I need a permit for aging-in-place renovations?
Yes, most plumbing, electrical, and structural changes require permits. Check with your local building department.
What flooring is best for accessibility?
Slip-resistant vinyl or textured porcelain tile provides traction and easy maintenance.
Can I retrofit grab bars into existing walls?
Yes, if studs or blocking exist behind the drywall. If not, a professional can add reinforcement.
What is the lifespan of universal design features?
High-quality fixtures and grab bars last decades with routine inspection and cleaning.
Pro Tips for Success
Plan accessibility upgrades before health or mobility changes occur. Prioritize safety and ease of use in high-traffic areas such as bathrooms, kitchens, and entries. Choose durable materials, keep pathways wide, and maintain good lighting throughout your home. A thoughtful universal design remodel protects your independence, comfort, and investment for years to come.


