The True Cost of Your Dream Spa Bathroom Remodel
Quick Answer Box
A spa bathroom remodel converts an ordinary bathroom into a personal wellness sanctuary featuring steam showers, deep soaking tubs, and premium finishes. Budget for $35,000 to $90,000, influenced by room dimensions, material selections, and complex mechanical integrations. Completion typically requires 4 to 8 weeks. The project presents advanced challenges, including extensive plumbing rerouting, electrical enhancements, and comprehensive waterproofing. Potential risks encompass water infiltration leading to structural damage, electrical malfunctions, and load-bearing issues from heavy fixtures. Engage licensed experts for all plumbing, electrical, and steam installations to ensure compliance and safety.
Step-by-Step Instructions
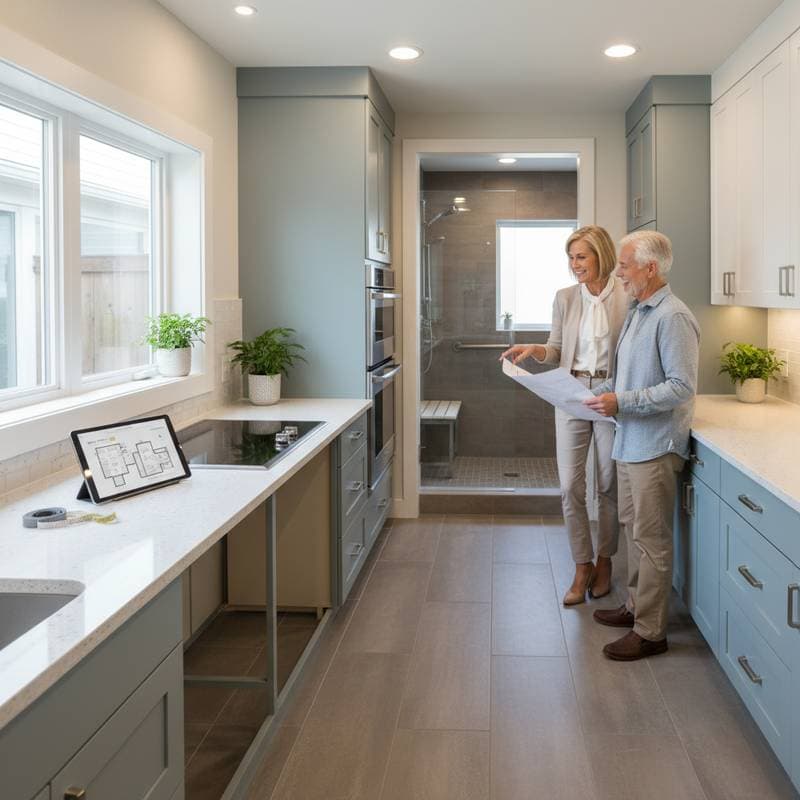
1. Plan the Layout and Budget
Determine the intended use of the space by defining distinct areas for showering, bathing, and preparation. Conduct precise measurements and create a detailed, scaled diagram to visualize fixture placements.
- Obtain detailed, written quotes from certified contractors covering plumbing modifications, tile applications, and electrical upgrades.
- Reserve a minimum of 20 percent of the overall budget for unforeseen expenses, such as material price fluctuations or structural discoveries.
Check: Confirm that the proposed design accommodates the existing footprint while providing adequate clearance around doors, fixtures, and pathways for safe movement.
2. Prepare the Space and Remove Old Fixtures
Disconnect water supply and electrical power to the area. Safeguard neighboring rooms with plastic sheeting and dust barriers to minimize disruption.
- Demolish and remove outdated fixtures, tiles, and drywall, focusing first on moisture-prone zones.
- Transport waste materials to an approved disposal site, adhering to local regulations for hazardous items like old paint or adhesives.
- Examine underlying framing for signs of water damage, rot, or mold growth, addressing any issues immediately.
Check: Verify that all exposed surfaces remain dry, structurally sound, and cleared of contaminants before proceeding with installations.
3. Upgrade Plumbing and Electrical Systems
Engage qualified, licensed specialists to handle these critical upgrades.
- Install fresh supply lines capable of supporting multiple showerheads, body jets, or rainfall features.
- Dedicate separate electrical circuits for steam generators, underfloor heating mats, and ambient lighting systems.
- Incorporate ground-fault circuit interrupter (GFCI) receptacles in all wet locations to comply with safety codes.
Check: Schedule and pass all necessary inspections for the updated systems prior to enclosing walls or floors.
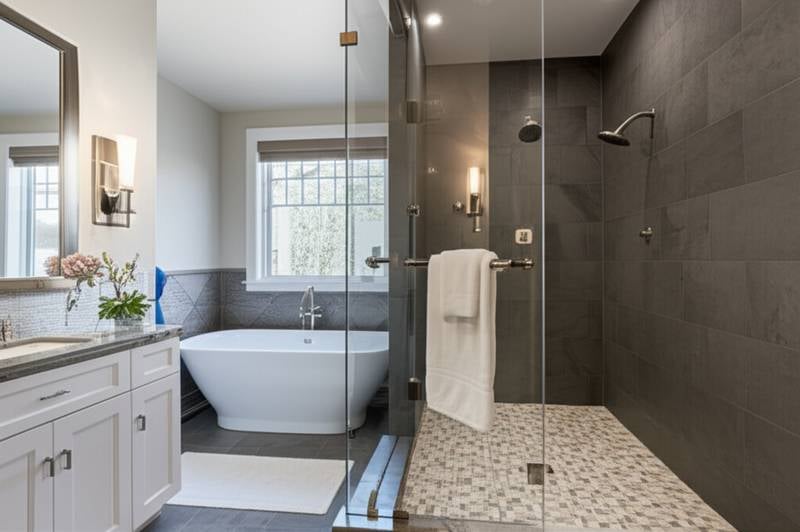
4. Install the Shower Base and Waterproofing
Apply a robust waterproofing membrane across every shower surface, including walls, floors, corners, and joints.
- Ensure overlaps of at least 4 inches at seams and seal them meticulously according to product guidelines.
- Establish a proper slope on the shower floor, aiming for a minimum of 1/4 inch per linear foot directing toward the drain.
Check: Test the setup by introducing a controlled volume of water and observing for efficient drainage without pooling or seepage.
5. Set Tile and Grout
Begin tiling operations with wall applications, progressing to floors for optimal workflow. Select and apply thinset mortar specifically formulated for high-moisture environments.
- Maintain uniform spacing between tiles using 1/8-inch plastic spacers to achieve consistent grout lines.
- Apply grout thoroughly, then seal all lines and perimeter edges with flexible silicone caulk to enhance durability.
Check: Inspect for level alignment, fully filled joints, and solid adhesion by tapping tiles; avoid any loose or echoing sounds.
6. Install the Steam System and Ventilation
Retain a licensed electrician to manage wiring for the steam generator and related components.
- Position the generator unit in a well-ventilated, easily accessible spot outside the immediate shower enclosure.
- Route steam through insulated copper piping to minimize heat loss and condensation buildup.
- Integrate a powerful exhaust fan rated for high humidity to effectively manage moisture levels and prevent mold.
Check: Activate the system and monitor for uniform steam distribution, absence of leaks, and controlled condensation on surfaces.
7. Add Fixtures and Finishing Touches
Position the freestanding tub, vanity cabinet, framed mirrors, and overhead or task lighting.
- Opt for energy-efficient LED bulbs and fixtures certified for damp or wet locations.
- Select corrosion-resistant finishes like brushed nickel, oil-rubbed bronze, or polished chrome for longevity in humid conditions.
Check: Ensure every fixture sits plumb and level, secures firmly to the structure, and operates without hitches.
Quality Checks and Troubleshooting
- Persistent steam leaks: Examine door seals, steam head connections, and pipe joints; replace worn gaskets or tighten fittings as required.
- Grout discoloration: This often signals subsurface moisture; cleanse with a neutral pH cleaner and apply fresh sealant.
- Slow drainage: Disassemble the drain assembly to extract clogs, then reconfirm the floor slope meets specifications.
- Fogged mirrors: Install an anti-fog heating pad beneath the mirror or enhance airflow with supplemental ventilation.
Conduct thorough inspections of caulked areas biweekly during the initial month post-completion. Promptly reseal any emerging cracks to block potential water entry and preserve integrity.
When to Call a Pro
Seek assistance from a licensed contractor or specialized technician when encountering:
- Evidence of structural deterioration or mold proliferation concealed within walls.
- Frequent circuit breaker trips following the addition of heated elements or new lighting.
- Inconsistent pressure or visible leaks in the steam apparatus.
- Relocation of major plumbing components, such as vent stacks or waste lines.
Typical Costs for Professional Help
- Plumbing enhancements: $3,000 to $8,000, covering pipe rerouting and fixture integrations.
- Electrical work and radiant floor heating: $2,000 to $6,000, including circuit additions and code compliance.
- Steam system setup: $4,000 to $10,000, encompassing generator installation and piping.
- Tile setting and waterproofing labor: $8,000 to $20,000, dependent on surface area and material complexity.
Evaluate candidates through verification of state licenses, proof of insurance coverage, and client testimonials. Request itemized proposals detailing materials, labor hours, and any permit or inspection charges.
Pro Tips for Success
- Select porcelain or ceramic tiles with water absorption rates below 0.5 percent to withstand constant humidity.
- Limit steam enclosure ceiling heights to 8 feet or less, promoting efficient heat retention and even distribution.
- Incorporate a built-in bench and adjustable hand shower to enhance usability and accessibility for all users.
- Integrate dimmable LED lighting layers, combining ambient glow with focused task illumination for versatile moods.
- Designate dedicated storage solutions for linens and amenities in non-steam zones to avoid dampness and mildew accumulation.
Maintaining Your Spa Sanctuary
Regular upkeep sustains the elegance and functionality of your remodeled space. Implement a routine of gentle cleaning with non-abrasive products to protect surfaces. Monitor humidity levels and ventilate promptly after use to prevent buildup. These practices, combined with periodic professional inspections, safeguard your investment and prolong the enjoyment of daily relaxation.