Essential Tools and Materials
Prepare the following items to execute a universal design remodel effectively:
- Power drill equipped with standard bits for secure installations
- Stud finder to locate wall supports for mounting hardware
- Level to ensure even surfaces and alignments
- Measuring tape for precise dimensions
- Circular saw or handsaw for cutting materials to fit
- Grab bars rated to support at least 250 pounds of weight
- Non-slip flooring options such as textured vinyl or laminate
- Lever-style door handles for easier operation
- Low-threshold shower kits to eliminate barriers
- Adjustable lighting fixtures for customizable illumination
- GFCI outlets to enhance electrical safety in wet areas
Step-by-Step Guide to Universal Design Remodeling
1. Evaluate Existing Accessibility Features
Begin by conducting a thorough inspection of your home. Walk through every room to identify potential hazards, including narrow doorways, elevated thresholds, and glossy floor surfaces that could lead to slips.
- Measure door widths; aim for at least 32 inches to accommodate wheelchair passage.
- Verify that hallways measure no less than 36 inches across to allow smooth navigation.
Once complete, compile a detailed list of required changes. This inventory guides your purchasing decisions and prevents unnecessary work during later phases.
2. Develop a Budget and Set Priorities
Focus on high-impact areas first, such as bathrooms and entry points, where safety concerns are most acute. Allocate funds wisely by reserving 10 to 15 percent of your total budget for unforeseen issues like hidden structural repairs.
- Obtain detailed, written quotes from a minimum of two qualified contractors to compare options.
- Prioritize modifications that address immediate needs while leaving room for phased expansions.
A well-structured plan ensures the project aligns with your financial limits and supports long-term adaptability.
3. Enhance Entryway Accessibility
Transform challenging entrances by installing ramps in place of steep stairs or expanding narrow doorways for better flow.
- Design ramps with a 1:12 slope ratio, meaning 12 inches of ramp length for each inch of vertical rise.
- Mount handrails on both sides at a height of 34 to 38 inches for reliable support.
Avoid altering load-bearing walls; consult a licensed professional for any such modifications to maintain structural integrity.
4. Install Safer Flooring Solutions
Eliminate risks from loose area rugs and polished tiles by opting for durable, slip-resistant alternatives.
- Select flooring with a wet coefficient of friction exceeding 0.6 to minimize sliding hazards.
- Keep transitions between rooms under ½ inch to avoid stumbling points.
After installation, test the surfaces by walking through the space to confirm stability and traction under various conditions.
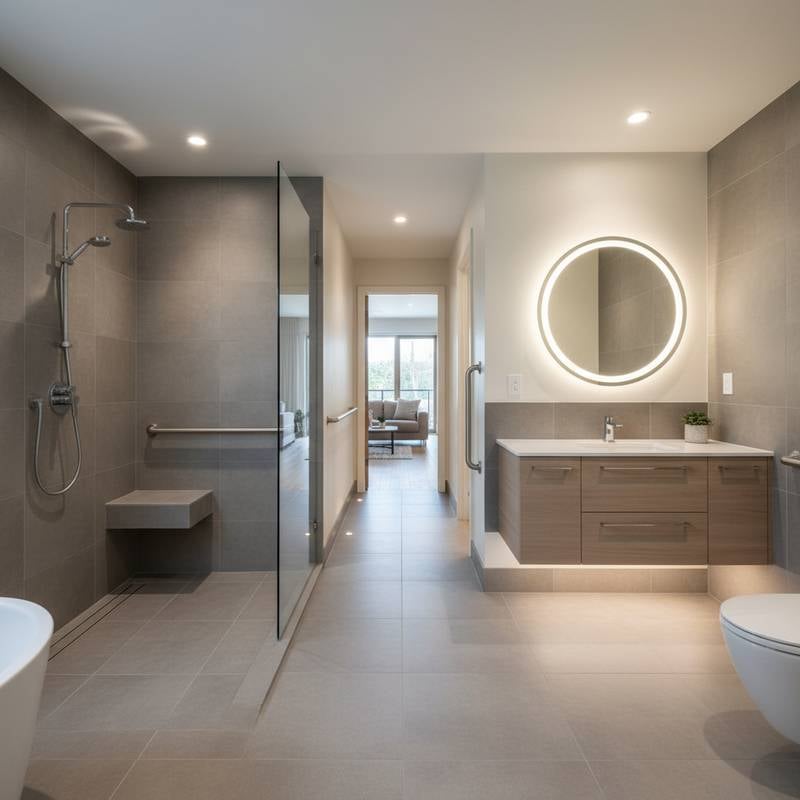
5. Revamp the Bathroom for Reduced Fall Risks
Bathrooms rank as the most dangerous rooms for accidents, so prioritize comprehensive updates here.
- Secure grab bars adjacent to the toilet and within the shower area for steady support.
- Convert traditional tubs to curbless showers, incorporating non-slip mats and fold-down seating.
- Add a handheld showerhead mounted on an adjustable bar to accommodate different heights.
Engage a licensed plumber for any relocation of drains or installation of new fixtures to comply with building codes.
6. Optimize Lighting and Electrical Systems
Inadequate illumination contributes to many mishaps, particularly in low-traffic zones.
- Swap out overhead fixtures for distributed LED lighting that provides uniform brightness.
- Integrate motion-activated sensors in corridors and bathrooms for automatic activation.
- Position light switches at 42 inches from the floor and outlets at 18 inches for reachable access.
A certified electrician should perform all rewiring to ensure safety and code adherence.
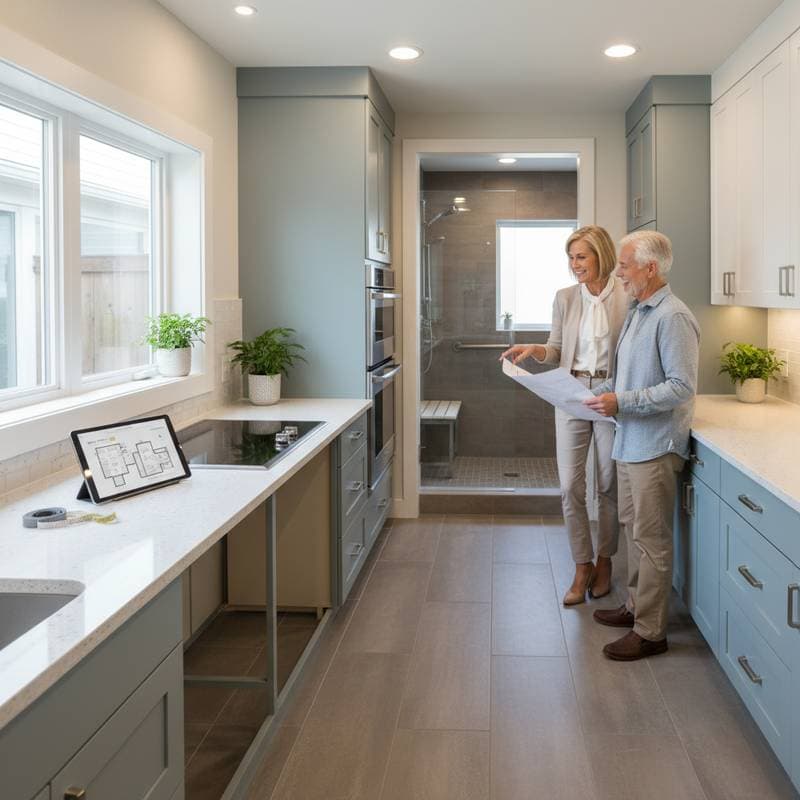
7. Reconfigure the Kitchen for Functional Efficiency
Adjust the layout to minimize physical strain during daily tasks like cooking and meal preparation.
- Store everyday essentials on accessible shelves positioned between 15 and 48 inches from the floor.
- Replace fixed cabinetry with pull-out drawers to simplify retrieval.
- Fit lever handles on faucets and appliances for effortless control.
These changes promote independence without requiring excessive reaching or bending.
8. Validate and Test Modifications
Conclude the project with a full walkthrough to assess each upgrade.
- Test ramps, grab bars, and fixtures for firmness and usability.
- Confirm that all electrical components, including outlets and lights, operate reliably.
Address any discrepancies immediately to guarantee a seamless, hazard-free environment.
Managing Debris and Final Cleanup
Clear construction waste without delay to maintain a safe workspace. Transport old flooring, drywall scraps, and fixtures to designated local disposal sites, or engage a professional hauling service for larger volumes.
Recycle metals and salvageable wood where feasible. Thoroughly sweep and vacuum all areas to eliminate dust accumulation that might create additional slip risks.
Addressing Common Issues
- Instability in grab bars: Secure screws directly into wall studs rather than using drywall anchors alone.
- Irregular floor levels: Smooth transitions by sanding or applying leveling compounds.
- Drainage problems in showers: Ensure the floor pitches at a minimum of ¼ inch per foot toward the drain to prevent water buildup.
- Intermittent lighting: Start by replacing bulbs; if issues persist, summon a licensed electrician for inspection.
Ongoing Maintenance Practices
Schedule inspections of grab bars, ramps, and flooring every six months. Tighten loose hardware promptly and replace any degraded components to preserve functionality.
LED fixtures offer longevity up to 25,000 hours, yet regularly check switches and sensors for responsiveness. Maintain non-slip surfaces by cleaning with a mild detergent solution to sustain grip effectiveness.
Engaging Professional Help
Delegate structural alterations, plumbing adjustments, or electrical upgrades to licensed experts. Typical expenses include:
- Bathroom overhauls: $10,000 to $25,000
- Kitchen accessibility enhancements: $8,000 to $30,000
- Entry ramp additions: $2,000 to $5,000
- Comprehensive home retrofits: $40,000 to $80,000
When choosing contractors, demand verification of licenses and insurance coverage. Review references from comparable universal design projects and confirm adherence to local regulations.
Strategies for Lasting Results
Initiate changes in priority zones like bathrooms before progressing to other spaces. Preserve unobstructed pathways and steady lighting throughout the home. Select robust, easy-care materials that lower ongoing expenses. Beyond facilitating aging in place, these investments elevate your property's market appeal and versatility for diverse users.