2025 Wet Rooms: Design a Leak-Proof Spa Sanctuary
A wet room converts a conventional bathroom into an open, streamlined environment that evokes spa tranquility. This comprehensive guide details the definition of a wet room, construction methods, associated expenses, and strategies for a high-quality installation that boosts usability and property worth.
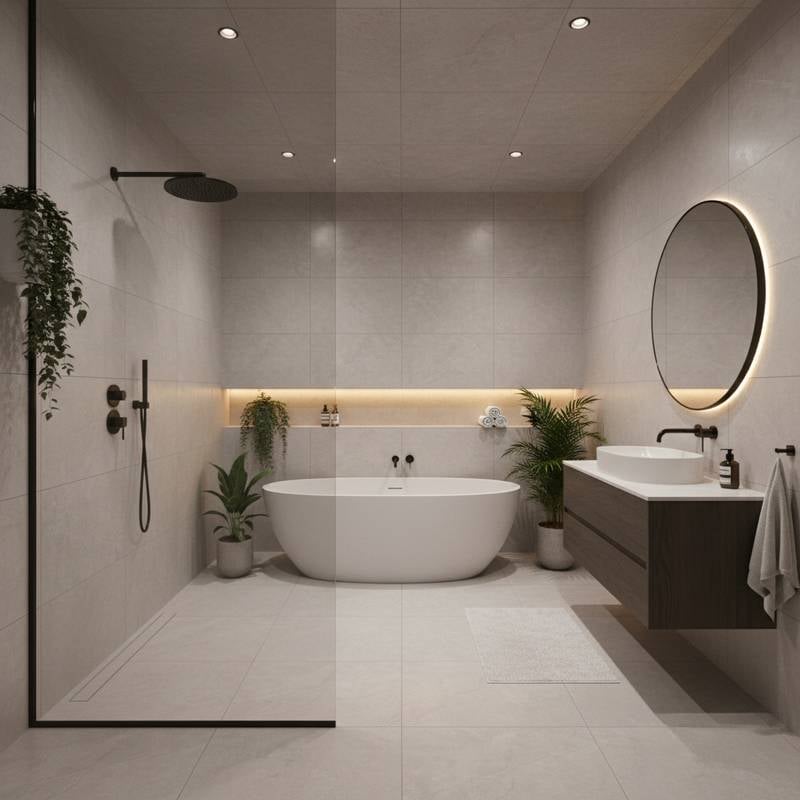
Essential Overview
A wet room features complete waterproofing throughout the bathroom, with the shower zone integrated at floor level. Water flows to a hidden drainage system instead of a traditional raised enclosure. This approach yields a minimalist, barrier-free design that supports both aesthetic appeal and practical accessibility.
Expense and Duration Projections
Typical Expense Ranges:
- Self-Directed Installation: Approximately 6,000 to 10,000 dollars, influenced by room dimensions, selected materials, and waterproofing choices.
- Expert Installation: Approximately 12,000 to 25,000 dollars, varying with design intricacy and premium finishes.
Key Expense Influences:
- Bathroom dimensions and extent of waterproofing requirements.
- Selections in tiles, natural stone, or alternative surfacing options.
- Drainage configuration, such as linear versus point systems.
- Necessary plumbing modifications or repositioning.
- Fees for permits and regulatory inspections.
- Regional variations in labor charges.
Project Duration:
- Self-Directed: Two to four weeks, contingent on expertise and scheduling availability.
- Expert-Led: One to two weeks for routine undertakings.
Skill Level Assessment: Advanced.
Precise execution of waterproofing, drainage gradients, and tiling proves essential. Faulty application risks water infiltration and potential structural harm.
Self-Directed Versus Expert Assistance
Scenarios for Self-Directed Efforts
Individuals with proficiency may manage preliminary tasks, including:
- Demolition of existing fixtures and surface treatments.
- Subfloor and wall surface preparation.
- Tile placement under expert oversight.
- Application of paint or finishes to adjacent spaces.
Proficiency in plumbing, tiling, and waterproofing remains mandatory. Minor missteps often escalate into significant water-related complications.
Indications for Expert Involvement
Engage a certified specialist for critical elements, such as:
- Establishment of floor gradients and drainage mechanisms.
- Deployment of waterproof membranes and vapor barriers.
- Plumbing adjustments or flow equalization.
- Reinforcement of structures or subfloor adjustments.
- Adherence to building codes and oversight of inspections.
Expense Evaluation:
Professionals typically assess 60 to 100 dollars per square foot, providing guarantees and reliability. Self-directed approaches reduce labor outlays yet impose complete liability for any water damage or failures.
Required Equipment and Supplies
Equipment:
- Tile cutter and wet saw for precise cuts.
- Trowels and grout floats for application.
- Level and measuring tape for accuracy.
- Drill equipped with mixing paddle.
- Utility knife for detailed work.
- Waterproof roller and brush for coatings.
- Protective equipment, including gloves, goggles, and knee pads.
Supplies:
- Waterproof membrane or comprehensive tanking kit.
- Cement backer board for durable backing.
- Modified thin-set mortar for adhesion.
- Mildew-resistant grout for longevity.
- Drain assembly, either linear or point style.
- Silicone sealant for joints.
- Slip-resistant floor tiles.
- Wall tiles or waterproof panels.
- Primer, screws, and joint tape for securing.
Detailed Installation Process
1. Layout Planning
Identify the shower area's position. Position the drain centrally or adjacent to a wall to facilitate uniform water dispersal.
Ensure the configuration promotes unobstructed water movement and prevents accumulation.
2. Subfloor and Wall Preparation
Strip away existing flooring and wall coverings to expose the subfloor and framing. Address any decay or irregularities.
Verify that surfaces stand firm and free of contaminants prior to waterproofing application.
3. Drain Placement and Gradient Creation
Secure the drain base per manufacturer specifications. Construct a gradient of 1/4 inch per foot toward the drain using mortar or a prefabricated sloped base.
Employ a level to validate consistent inclination across all directions.
4. Waterproof Membrane Application
Coat the full floor and lower wall areas with liquid or sheet membrane. Overlap joints and reinforce corners with sealing tape.
Caution: Moisture Vulnerability
Omit no voids, as they invite infiltration. Observe prescribed curing periods before proceeding to tiling.
Confirm waterproof integrity by observing water beading on the cured surface.
5. Wall Board Installation and Joint Sealing
Fasten cement backer boards to walls using corrosion-resistant screws. Seal seams with waterproof tape and thin-set mortar.
Inspect for absence of gaps or unsecured fasteners.
6. Tiling Floors and Walls
Commence tiling from the drain outward. Opt for slip-resistant floor tiles and larger wall tiles to minimize grout lines.
Alert: Slip Hazard
Refrain from traversing newly laid tiles until the adhesive sets fully.
Ensure tiles align evenly with uniform grout spacing.
7. Joint and Fixture Sealing
Distribute silicone sealant along edges, corners, and fixture perimeters. Reattach shower components and evaluate water distribution.
Verify containment of water within the designated zone.
8. Drainage Verification
Operate the shower for multiple minutes to assess flow efficiency. Monitor for stagnation or delayed evacuation.
Ascertain rapid water clearance and surface drying shortly thereafter.
Safety Protocols and Best Practices
- Alert: Electrical Risk
Deactivate power to nearby outlets and illumination prior to any electrical proximity work. - Don non-slip footwear and gloves throughout tiling procedures.
- Utilize a respirator during mortar or grout mixing to mitigate dust exposure.
- Maintain ventilation to control moisture accumulation.
- Adhere strictly to curing durations for waterproof elements before water contact.
Issue Resolution and Verification Methods
Issue: Water Accumulation in Corners
Resolution: Reassess gradient and apply leveling compound as required.
Issue: Grout Staining or Mold Growth
Resolution: Employ mildew-resistant grout and commit to routine cleaning schedules.
Issue: Drainage Connection Leakage
Resolution: Secure connections or apply plumber's putty combined with sealant.
Verification Protocol:
Seals must cover all joints, tiles require secure attachment without resonance upon tapping, and a ten-minute water test should reveal no seepage beneath or adjacent to the floor.
Post-Installation Cleanup and Waste Management
Gather debris and fragmented tiles for transport to designated construction waste sites.
Clean tools immediately to prevent mortar or grout solidification.
Follow local regulations for disposing of waterproofing containers and chemical residues.
Wipe surfaces thoroughly and polish fixtures to eliminate residual buildup.
Upkeep and Durability Expectations
Properly constructed wet rooms endure for decades under diligent maintenance. Implement these routines:
- Weekly cleaning of tiles and grout using gentle solutions weekly.
- Annual resealing of grout lines.
- Biannual inspection and reapplication of silicone at joints if degradation occurs.
- Routine clearance of drains from obstructions like hair and sediment.
- Examination of seals upon detection of dampness or odors.
Premium membranes and tiles sustain watertightness for twenty years or longer with consistent care.
Criteria for Expert Intervention
Benchmarks Requiring Specialist Aid
Seek professional assistance upon facing:
- Unstable subfloors or evidence of rot.
- Elaborate plumbing alterations.
- Manifestations of leaks in ceilings or walls.
- Electrical integrations in moisture-prone areas.
- Permitting or inspection demands exceeding self-directed capabilities.
Standard Expert Expenses
- Fundamental Conversion: Approximately 12,000 to 15,000 dollars.
- Premium Stone and Glass Designs: Approximately 20,000 to 30,000 dollars.
- Bespoke Spa Remodels: Up to 40,000 dollars or beyond.
Specialist Selection Criteria
- Possession of valid licensing and insurance.
- Proven track record in wet room projects.
- Detailed cost estimates and schedules in writing.
- Client testimonials.
- Warranties covering waterproofing and labor.
Dependable specialists handle inspections and code conformity seamlessly.
Expert Recommendations for Optimal Results
- Deploy a unified waterproofing system encompassing floor, walls, and ceiling margins.
- Choose tiles certified for wet environments with R10 or superior slip resistance.
- Prefer linear drains for contemporary aesthetics and simplified maintenance.
- Integrate underfloor heating to enhance comfort and expedite drying.
- Install robust exhaust fans to regulate humidity.
- Select recessed, wet-rated lighting for secure, refined illumination.
Knowledge of procedures empowers informed budgeting and quality assurance, regardless of execution method.
Realizing the Benefits of Your Wet Room
Wet rooms deliver enhanced comfort, universal access, and enduring style. The barrier-free arrangement fosters fluid transitions between showering and other functions. Through meticulous planning, robust waterproofing, and ongoing upkeep, this upgrade yields prolonged enjoyment, elevates routine experiences, and augments residential value.


