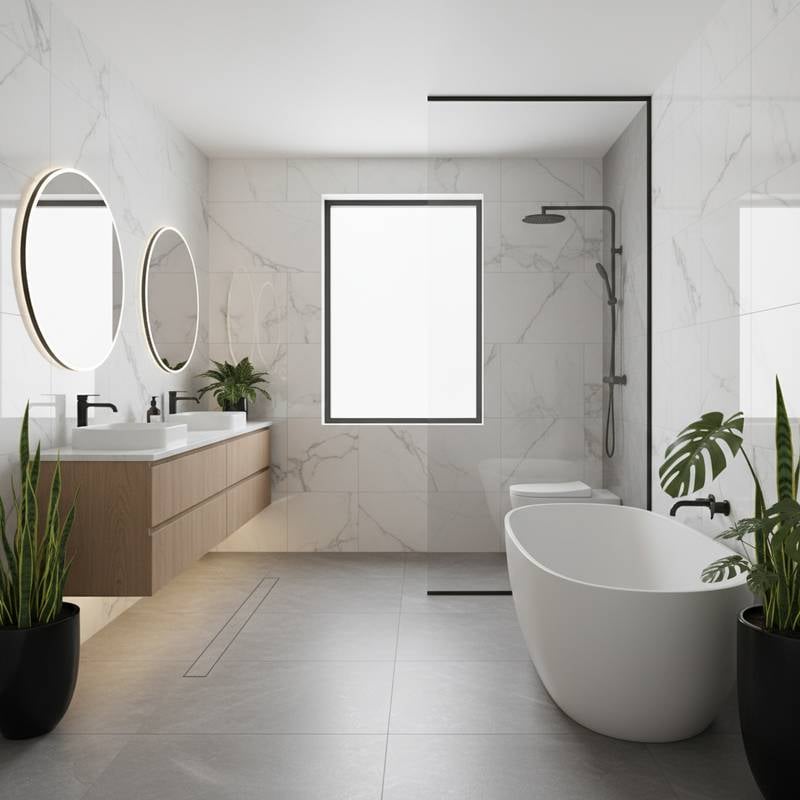
Why Wet Rooms Surpass Traditional Baths in 2025
Wet rooms convert ordinary bathrooms into fully waterproof, open spaces that blend aesthetics with functionality. This guide details the advantages of wet rooms over traditional baths, including enhanced accessibility and contemporary design. It also covers essential aspects such as expenses, installation processes, and upkeep requirements.
Essential Overview
A wet room features a shower zone flush with the floor, with the entire area sealed against water. This design dispenses with conventional shower bases or enclosures, resulting in a fluid, contemporary appearance that simplifies cleaning and upkeep.
Expense and Timeline Projections
Typical expense spectrum:
- Materials: $3,000 to $8,000, influenced by tile variety, waterproofing methods, and hardware choices.
- Labor: $4,000 to $10,000, varying with project intricacy, pipe configurations, and local rates.
- Complete installation expense: $7,000 to $18,000 for expert construction of a wet room.
Self-directed installation: $3,500 to $8,000, assuming possession of necessary tools and proficiency in waterproofing and tiling.
Expert installation duration: One to three weeks, based on room dimensions and layout complexity.
Skill level: Advanced. Precise waterproofing, floor angling, and drainage demand expert knowledge.
Elements affecting expenses:
- Tile options (ceramic, porcelain, or natural stone).
- Drainage style (linear systems incur higher costs yet provide a neater finish).
- Room dimensions and configuration.
- Current floor framework and pipe accessibility.
- Local labor costs and required permits.
Self-Directed Versus Expert Installation Advice
Self-directed installation suits those who:
- Possess skills in tiling and applying waterproof layers.
- Know how to angle floors toward drains.
- Can evaluate and adjust plumbing without risk.
Engage experts for situations involving:
- Relocation of drain pipes or alteration of floor supports.
- Homes with timber subfloors needing fortification.
- Certified waterproofing to secure warranties or insurance coverage.
Expense contrast:
- Self-directed: $3,500 to $8,000.
- Expert: $7,000 to $18,000.
Expert services guarantee effective drainage, adherence to regulations, and avoidance of future leaks.
Detailed Installation Process
1. Design the Configuration
Determine the shower zone position. Account for a gentle floor incline leading to the drain.
- Verify compatibility of current plumbing.
- Position fixtures near existing pipes to minimize expenses.
Verification point: Drain placement and incline scheme comply with regulations and access routes.
2. Ready the Subfloor
Strip away existing coverings and inspect for decay or weaknesses. Repair compromised areas.
- Strengthen supports if necessary to bear the weight of added tiles.
Verification point: Subfloor stands firm, even, and prepared for waterproofing.
3. Fit the Drain and Form the Incline
Access the floor to place a drain equipped with a waterproof collar. Construct an incline of roughly 1/4 inch per foot directing to the drain.
- Employ a prefabricated shower foundation or mortar layer.
Verification point: Water channels uniformly to the drain, avoiding accumulation.
4. Deploy Waterproof Layering
Spread a waterproof layer over the floor and ascend the walls by at least 12 inches.
- Secure all joints and edges with waterproof banding.
- Conduct a leak test prior to tiling.
Alert: Risk of Water-Induced Harm
Inadequate sealing may lead to enduring structural issues. Adhere strictly to producer guidelines.
Verification point: Leak test reveals no water penetration.
5. Lay Tiles on Floor and Walls
Select non-slip porcelain tiles for the floor paired with water-resistant grout.
- Begin at the drain and proceed outward.
- Insert spacers to maintain even intervals.
Verification point: Tiles lie flat, grout seams consistent, and drain integrates seamlessly.
6. Mount Fixtures
Secure shower outlets, controls, and optional glass barriers.
- Apply silicone sealant at connections to preserve waterproof integrity.
Verification point: Fixtures function properly with no leaks.
7. Concluding Review
Circulate water for multiple minutes to validate drainage efficacy.
Verification point: Water drains efficiently, and moisture remains confined to the sealed area.
Security Precautions and Recommendations
Alert: Electrical Precautions
For added illumination or warmed floors, disconnect power at the main switch prior to electrical work. Install circuits protected by ground fault interrupters.
Alert: Slippage Danger
Opt for floor tiles featuring textured surfaces with anti-slip ratings suitable for damp conditions.
Safety equipment:
- Gloves and knee guards during tiling.
- Protective eyewear for tile cutting.
- Breathing mask when blending mortar or grout.
Recommendation: Establish a dry area by the entry using a glass barrier or segmented divider.
Issue Resolution and Verification Methods
Frequent issues and solutions:
- Water accumulation: Incline insufficiently steep. Reconstruct or modify mortar layer near the drain.
- Grout staining: Employ epoxy grout for superior resistance to marks.
- Leaks at wall edges: Reexamine layer seals and reinforce edges with waterproof banding.
- Delayed drainage: Clear the drain filter and ensure proper ventilation.
Verification procedures:
- Incline guides all water to the drain.
- No apparent spaces in tile connections.
- Surfaces dry promptly following use.
Debris Removal and Waste Handling
Clear away tile fragments, outdated fixtures, and packing items.
- Transport old tiles and grout remnants to a nearby construction recycling facility.
- Rinse tools with warm water prior to mortar or grout setting.
- Store excess waterproofing supplies in a dry location for subsequent applications.
Upkeep and Durability
Correctly assembled wet rooms demand minimal ongoing care.
Standard maintenance:
- Dry surfaces after each use to avoid mineral deposits.
- Clean grout seams weekly using a gentle bathroom solution.
- Examine silicone seals biannually and renew as required.
Expected longevity:
A well-constructed wet room endures 20 years or longer. Tiles and grout might require refreshing after 10 to 15 years, contingent on usage.
Recommendation: Maintain robust airflow. Install an exhaust fan designed for persistent humidity to inhibit mold development.
Indicators for Expert Intervention
Seek professional help if:
- Leaks persist, walls feel damp, or flooring yields under pressure.
- Drainage lags or the incline appears irregular.
- Plumbing pipes require replacement or repositioning.
Expert repair expenses:
- Basic waterproofing fixes: $800 to $1,500.
- Drain shifts or comprehensive retiling: $3,000 to $7,000.
Specialist selection criteria:
- Confirm licensing and insurance coverage.
- Request images of prior wet room installations.
- Obtain a documented warranty for waterproofing and tiling.
- Ensure materials conform to local building standards.
Advantages of Wet Rooms Over Traditional Baths
- Accessibility Benefits: Step-free access suits individuals with mobility limitations.
- **Spatial ** Eliminating the tub expands floor space in compact bathrooms.
- Contemporary Aesthetics: Uninterrupted flooring and sparse layouts yield a refined, expansive feel.
- Simplified Cleaning: Reduced crevices and seams accelerate maintenance.
- Robust Construction: Comprehensive waterproofing shields walls and floors from water harm.
- Property Enhancement: Wet rooms rank as desirable upgrades in current residences.
- Versatile Integration: Pair a wet shower with a standalone tub where room permits.
Expert Recommendations for Optimal Results
- Select linear drains for streamlined visuals and simplified incline creation.
- Position wall recesses inside the waterproof boundary for practical storage.
- Apply a liquid membrane beneath tiles as an extra humidity shield.
- Validate drain and incline functionality pre-tiling to prevent expensive corrections.
- Choose oversized tiles to minimize grout seams and ease upkeep.
Implementing Your Wet Room Upgrade
Transforming your bathroom into a wet room yields a contemporary, user-friendly, and inclusive environment. Although initial investments exceed those of basic bath renovations, the enduring resilience and elegance typically warrant the outlay. Thorough preparation, meticulous waterproofing, and skilled implementation guarantee seamless performance over time.
For a fluid, barrier-free shower setup, engage a qualified specialist experienced in wet room projects. Evaluate layouts, solicit bids, and verify use of proven waterproof technologies. With precise execution, your wet room provides superior comfort, security, and worth compared to conventional baths.


