Cost Breakdown for Aging-in-Place Bathrooms
An aging-in-place bathroom promotes safety, comfort, and independence as needs change over time. This guide details how to budget effectively for such a remodel. Readers gain insights into expense allocation, essential features, and decisions that align with specific spaces and routines.
Understanding the Concept
Aging-in-place design emphasizes usability, risk reduction, and enduring performance. Key elements address mobility challenges and enhance daily tasks while preserving privacy. Common modifications include reinforced supports, zero-threshold entries, and intuitive controls, all integrated to support seamless navigation.
Planning Your Budget
Establish a budget grounded in personal priorities before any work begins. Remodels range from targeted enhancements to comprehensive overhauls, with costs influenced by room dimensions, current infrastructure, and selected components. The following sections outline typical allocations to guide informed planning.
1. Layout and Entry Modifications
Essential Changes
Widen doorways to at least 32 inches for unobstructed passage. Remove thresholds to create level transitions from adjacent rooms. Consider pocket doors to maximize interior space without swinging barriers.
Cost Considerations
Door widening involves framing adjustments and may require electrical relocation, adding to expenses. Threshold elimination demands precise subfloor leveling. Pocket doors offer space efficiency but increase installation complexity and price.
Benefits and Implementation
These alterations facilitate wheelchair access and reduce tripping points. Consult local building codes early to ensure compliance. Professional assessment identifies structural needs, preventing costly surprises.
2. Flooring and Surfaces
Options and Pricing
Select porcelain or ceramic tiles with textured surfaces for superior grip. Vinyl sheets provide a seamless, waterproof barrier ideal for wet areas. Cork or rubber options deliver cushioning that eases joint pressure.
Pricing depends on material grade and installation demands. Tiles require grout and sealing, elevating labor costs, yet they endure heavy use. Vinyl installs quickly for budget savings, while cork and rubber need moisture protection treatments.
Why It Works
Bathroom falls often occur on slick surfaces, particularly when water is present. Traction-enhanced materials minimize this danger. Lighter shades enhance illumination, aiding visibility for safer movement.
Pairing Suggestions
Opt for neutral palettes like Warm Sand, Pale Stone, or Soft Gray. These tones conceal splashes and coordinate with diverse styles, from contemporary to classic.
3. Lighting and Visibility Enhancements
Fixture Recommendations
Install multi-level lighting: overhead fixtures for general illumination, task lights near mirrors, and motion-sensor options for low-light areas. Use LED bulbs for energy efficiency and glare reduction. Add illuminated switches at accessible heights.
Cost Breakdown
Basic upgrades start affordably with fixture swaps. Advanced systems, including dimmers and sensors, raise costs due to wiring. Professional electricians ensure code adherence, especially in damp environments.
Why It Works
Adequate lighting prevents missteps by highlighting hazards. Adjustable brightness accommodates varying vision needs. Motion activation simplifies use for those with mobility limitations.
Pairing Suggestions
Integrate warm white LEDs with matte fixtures in brushed nickel or chrome. These complement neutral walls and prevent harsh shadows, fostering a serene atmosphere.
4. Toilets and Vanities
Height and Accessibility
Choose comfort-height toilets, elevated 17 to 19 inches for easier transfers. Wall-mounted models allow height customization and simplify cleaning. Floating vanities with knee space support seated access. Rounded edges on all components reduce injury risks.
Cost Breakdown
Comfort-height toilets represent a low-cost entry to accessibility. Wall-mounted units necessitate plumbing alterations, increasing fees. Floating vanities demand custom fabrication, though they enhance adaptability.
Why It Works
Elevated fixtures lessen physical strain during use. Open under-vanity areas accommodate wheelchairs or walkers. Lever faucets require minimal grip strength, promoting self-reliance.
Pairing Suggestions
Pair white quartz countertops with maple or light oak cabinetry for enduring appeal. Brushed bronze hardware introduces gentle contrast. Maintain soft hues to support visual clarity.
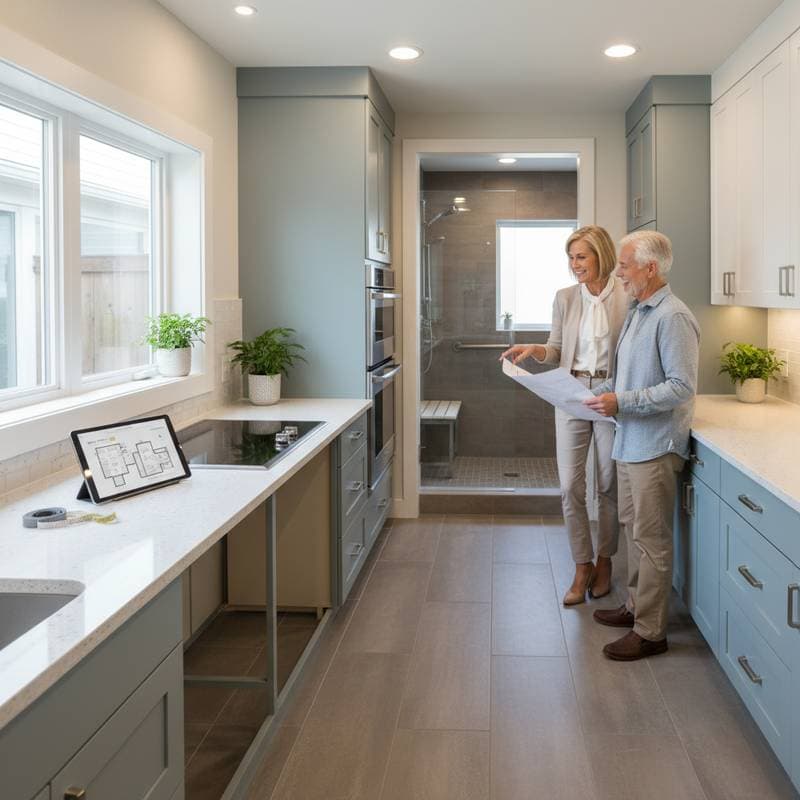
5. Shower and Tub Solutions
Design Options
Transition to walk-in showers with low or no curbs for step-free entry. Install fold-down seats and handheld showerheads for seated bathing. Convert tubs to showers if space permits, retaining soaker options with transfer benches.
Cost Estimate
Shower conversions range widely based on plumbing rerouting. Handheld units add minimal expense but significant convenience. Full tub removals involve demolition and waterproofing, elevating total outlay.
Why It Works
Barrier-free showers eliminate climbing hazards. Adjustable heads and seats enable safe, independent bathing. Non-slip mats and built-in benches further secure the area.
Pairing Suggestions
Select frameless glass enclosures with subway tiles in soft blues or greens. These evoke spa-like calm while ensuring durability and easy maintenance.
6. Grab Bars and Support Features
Placement and Options
Position bars adjacent to toilets, within showers, and beside tubs. Vertical installations aid rising motions; horizontal ones provide lateral support. Select stainless steel, matte black, or oil-rubbed bronze finishes that integrate aesthetically. Multi-use designs incorporate towel rings or robe hooks.
Cost Estimate
Bars themselves cost little, but installation includes wall reinforcement with plywood backing. Early planning embeds supports during remodels, avoiding later drywall disruption.
Why It Works
Strategically placed supports offer immediate stability during transfers. They distribute weight effectively, averting falls. Future-proofing allows additions without major renovations.
7. Doors and Windows for Accessibility
Modifications
Install lever handles on all doors for effortless operation. Add peepholes or vision panels at varied heights. For windows, choose crank-out styles with extended handles and ensure sills remain low for natural light access.
Cost Overview
Handle replacements prove inexpensive and quick. Window upgrades may involve frame adjustments for reachability. Ensure seals prevent drafts and maintain humidity control.
Why It Works
Lever mechanisms suit limited dexterity. Enhanced visibility improves awareness of surroundings. These elements contribute to an overall secure, navigable space.
Pairing Suggestions
Matte black levers pair with frosted glass panels. Neutral frames in white or wood tones blend seamlessly, preserving design harmony.
8. Storage and Accessibility Details
Design Strategies
Position lower shelves within arm's reach, typically 15 to 48 inches high. Incorporate pull-out trays in cabinets to avoid deep digging. Use open shelving for quick item location. Place locked medicine cabinets at eye level for convenience and security.
Cost Overview
Custom builds elevate prices through precise measurements. Stock units with modular inserts offer economical alternatives. Soft-close hardware extends usability and prevents slams.
Why It Works
Intuitive storage minimizes stretching or stooping, preserving balance. Organized access streamlines routines and reduces frustration. Secure options safeguard medications from unintended access.
Pairing Suggestions
Employ light maple wood or painted white cabinets for brightness. Matte black hardware provides crisp definition. Soft taupe walls ground the scheme warmly.
9. Electrical and Plumbing Upgrades
Key Improvements
Relocate outlets to 15-inch heights for seated access. Install ground-fault circuit interrupters throughout. Upgrade to low-flow fixtures that conserve water without sacrificing pressure.
Cost Factors
Wiring changes require licensed electricians to meet safety standards. Plumbing enhancements, like wider pipe spacing, support future adaptations. These prevent leaks and ensure reliable performance.
Why It Works
Accessible outlets eliminate awkward reaches. Protective circuits avert shocks in wet zones. Efficient systems lower utility bills over time.
10. Professional Labor and Project Management
Typical Labor Involvement
Projects engage carpenters for framing, plumbers for piping, electricians for circuits, and tilers for finishes. Specialists in universal design guarantee adherence to accessibility guidelines and building codes.
Cost Factors
Labor comprises 40 to 60 percent of budgets, varying with project scope. Intricate tasks like seamless entries demand expertise. Management oversight coordinates trades, averting delays and errors.
When DIY Works
Tackle minor tasks such as fixture swaps or bar mounting with proper tools. Reserve structural, electrical, or plumbing work for certified experts to uphold safety and legality.
Implementing Your Remodel
Prioritize safety and adaptability when executing an aging-in-place bathroom update. Focus initial investments on foundational elements like reinforced structures and traction surfaces for quick wins. Select versatile components that accommodate evolving requirements without frequent overhauls.
Collaborate with seasoned professionals to align aesthetics with functionality. They navigate regulations and recommend innovations that enhance daily life. The result delivers sustained security, ease, and enjoyment in a space tailored for enduring well-being.