Prefab ADU Costs: Achieve 30 Percent Savings Over Traditional Construction
Quick Overview
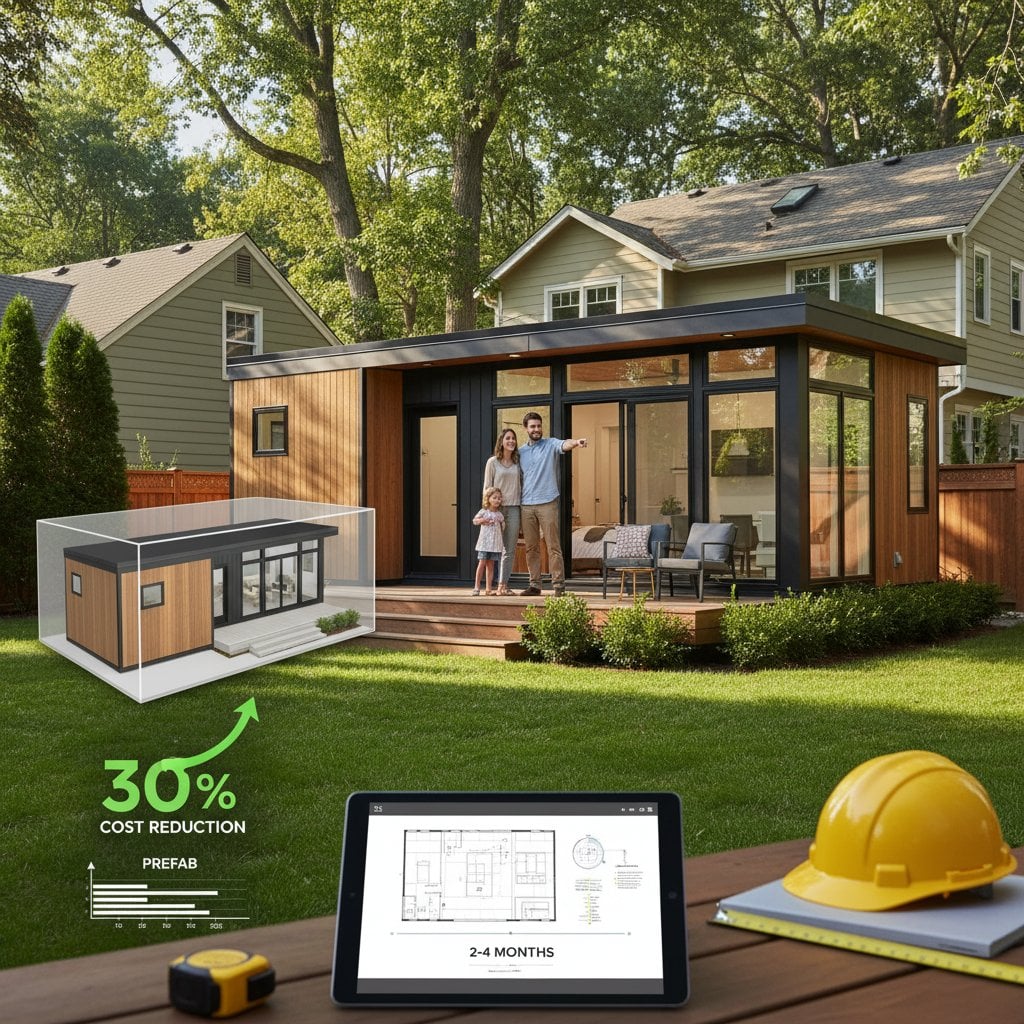
A prefab accessory dwelling unit, known as an ADU, consists of a pre-manufactured small home assembled off-site and then positioned on your property. This approach delivers the functionality of a conventional ADU while reducing expenses and timelines. Homeowners typically encounter 30 percent lower costs compared to stick-built options, with total investments ranging from $150,000 to $250,000. The installation process spans two to four months, and while homeowners can oversee permits and site preparation, the overall complexity remains moderate. Key safety considerations involve electrical integrations, heavy equipment handling, and foundation stability, all of which demand oversight from certified professionals.
Detailed Installation Guide
1. Verify Property Suitability
Begin by evaluating your lot dimensions and local zoning regulations. Certain municipalities restrict ADUs to specific districts or require adherence to lot coverage limits.
- Review municipal codes online or contact the planning office.
- Ensure your property meets minimum size requirements, often 4,000 to 7,000 square feet depending on the area.
Essential Verification: Secure documented approval from the planning department prior to committing to a prefab order.
2. Select an Appropriate Prefab Design
Identify a configuration that aligns with your available space, financial parameters, and intended purpose. Standard prefab ADUs measure between 300 and 800 square feet. Key comparison factors include:
- Layout options such as studio, one-bedroom, or two-bedroom configurations.
- Energy performance metrics, like insulation R-values and window efficiency.
- Roofing styles, such as pitched or flat, paired with durable siding materials like fiber cement or metal.
- Logistics for transportation and on-site assembly.
Essential Verification: Confirm the chosen unit can navigate your property's entry paths without obstruction.
3. Secure Necessary Permits
Provide the building authority with engineering plans supplied by the prefab producer. Accompany these with detailed site diagrams illustrating the foundation layout, utility pathways, and required setbacks from property boundaries.
- Expect review times of four to eight weeks in most jurisdictions.
- Address any revisions promptly to avoid delays.
Essential Verification: Obtain formal permit approval before initiating any groundwork.
4. Construct the Foundation
Prefab ADUs typically rest on one of three foundation systems, selected based on site conditions:
- Concrete slab foundations: Ideal for flat, stable ground, offering quick installation and minimal excavation.
- Pier and beam systems: Suitable for sloped or irregular landscapes, providing elevation and drainage benefits.
- Crawl space foundations: Beneficial for accessing plumbing and wiring, though they require more ventilation to prevent moisture buildup.
Engage a licensed contractor experienced in local requirements. The foundation must comply with seismic standards and frost line depths, which vary by region—often 24 to 48 inches in colder climates.
Essential Verification: Arrange an inspection to confirm the foundation meets specifications prior to unit delivery.
5. Arrange Utility Integrations
Coordinate with certified plumbers and electricians to establish connections for essential services.
- Water and sewage lines connect to your primary residence or public infrastructure, ensuring proper sizing for demand.
- Electrical setups adhere to code-mandated burial depths, typically 18 to 24 inches, and appropriate wire gauges for load capacity.
- Natural gas lines, if applicable, undergo pressure tests to verify integrity.
Essential Verification: Conduct inspections on all buried utilities to gain approval before the ADU shipment arrives.
6. Manage Delivery and Positioning
The manufacturer handles transportation logistics, delivering the unit in modular sections via flatbed trucks. A crane then lifts these components onto the prepared foundation. Prior to arrival, remove any low-hanging power lines, branches, or obstacles within a 50-foot radius.
- Delivery windows often span one to two days, weather permitting.
- Site access must accommodate vehicles up to 12 feet wide.
Essential Verification: Ensure the unit sits perfectly level and anchors firmly to the foundation using specified bolts and brackets.
7. Finalize Utility Hookups
Following placement, professionals link the water, drainage, and power systems. Apply weatherproof seals around all entry points to block water infiltration.
- Test each system individually for leaks or faults.
- Integrate heating, ventilation, and air conditioning if not pre-installed.
Essential Verification: Confirm operational integrity and schedule inspections to validate safety compliance.
8. Apply Finishing Touches
Address exterior elements by caulking joints in siding, attaching trim pieces, and constructing access features like stairs or railings. Internally, seal gaps, position appliances and lighting, and complete painting for a polished appearance.
- Use high-quality, low-VOC paints for health and durability.
- Install smoke detectors and carbon monoxide alarms as required.
Essential Verification: Inspect for complete weatherproofing and thorough cleaning before occupancy.
9. Conduct Final Review
The local building department performs a comprehensive evaluation to confirm adherence to all codes. Approval enables legal use, whether for personal residence or leasing.
- Prepare documentation including as-built drawings and material certifications.
- Address any noted deficiencies immediately.
Essential Verification: Retain the signed inspection certificate for your records and insurance purposes.
Addressing Potential Challenges
Frequent Concerns
Prefab installations occasionally encounter hurdles that proactive measures can resolve:
- Misaligned positioning: Double-check foundation flatness with a laser level prior to setting the unit.
- Seam infiltrations: Utilize silicone-based, exterior-rated sealants on all panel connections.
- Drainage delays: Inspect waste pipe inclines, aiming for at least one-quarter inch per foot, and remove any blockages.
- Power inconsistencies: Engage an electrician to diagnose and secure all wiring junctions.
Straightforward Resolutions
Many minor adjustments require basic tools and minimal effort:
- Secure any loosened fasteners on trim or exterior panels.
- Repaint areas marred during transit with matching shades.
- Fine-tune door and window hardware after initial settling, which may occur within the first 30 days.
Engaging Professional Expertise
Delegate complex elements to qualified specialists to ensure compliance and safety:
- Electrical system integrations.
- Gas piping installations.
- Foundation engineering and pouring.
- Any alterations to the structural frame.
Estimated expenses for these services include:
- Electrical work: $2,000 to $5,000, covering panel upgrades and metering.
- Plumbing tasks: $3,000 to $8,000, including line extensions and fixture hookups.
- Foundation development: $10,000 to $20,000, influenced by soil type and size.
- Crane operations: $1,000 to $3,000 per day, based on unit weight and reach.
Select contractors holding current licenses, comprehensive insurance, and strong references. Request itemized bids, past project examples, and assurances of code conformity.
Strategies for Optimal Results
To maximize efficiency and minimize risks, consider these recommendations:
- Initiate orders well in advance, as production queues may extend three to six months.
- Opt for straightforward designs to control expenses and streamline approvals.
- Commission a professional boundary survey to avoid encroachment issues.
- Account for on-site needs like vehicle storage, landscaping buffers, and sightline privacy.
- Prioritize resilient components, such as impact-resistant windows and UV-stable roofing, to lower long-term upkeep.
- Review your homeowner's policy to confirm coverage extensions for the new structure prior to installation.
Installed prefab ADUs qualify for identical tax assessments as site-built counterparts. Consult your county assessor for precise valuation and exemption details.
Maximizing Long-Term Value
Investing in a prefab ADU enhances your property's appeal, supports income through rentals, or provides flexible housing for relatives. The accelerated timeline and reduced outlay position it as a strategic choice for expanding living areas. Through diligent permit navigation, collaboration with skilled contractors, and routine maintenance, this addition delivers enduring utility at a fraction of conventional costs—approximately 30 percent less—while fully satisfying regulatory standards.


