Difficulty Level: Moderate for basic modifications; advanced for comprehensive renovations requiring structural changes.
Safety Precautions:
- Electrical Hazards: Always disconnect power sources prior to relocating outlets or switches to avoid shocks.
- Fall Prevention: Employ sturdy ladders and footwear with non-slip soles when operating at heights.
- Plumbing Precautions: Isolate the water supply before installing new faucets or shower components to prevent flooding.
- Structural Considerations: Engage a certified professional for alterations to load-bearing walls or floor structures to ensure stability.
Essential Tools and Materials:
- Precision tape measure for accurate dimensions
- Bubble level to verify even installations
- Cordless power drill with assorted bits for secure fastening
- Adjustable wrench for plumbing adjustments
- Electronic stud finder to locate framing supports
- Heavy-duty grab bars supporting at least 250 pounds
- Durable non-slip flooring options, such as textured vinyl or cork
- Ergonomic lever-style handles for doors, cabinets, and faucets
- Energy-efficient LED lighting fixtures for broad illumination
- Built-in shower seats or freestanding benches for stability
- Low-profile threshold ramps or seamless zero-entry kits for smooth transitions
Step-by-Step Implementation Guide
1. Evaluate Existing Layout and Barriers
Begin by conducting a thorough inspection of your home. Identify obstacles like narrow passages, elevated thresholds, or inadequate illumination that could impede mobility.
- Measure all doorways and corridors; aim for a minimum width of 36 inches to accommodate wheelchairs or walkers.
- Assess the placement of light switches and electrical outlets; position them between 15 and 48 inches from the floor for optimal reach.
Verification Step: Ensure pathways remain unobstructed, allowing fluid navigation without sharp angles or bottlenecks.
2. Enhance Entryways and Exits for Secure Access
Focus on eliminating elevation changes at entrances to facilitate easy movement. Install gentle ramps or bevel existing thresholds to create seamless entry points.
- Design exterior ramps with a gentle incline of 1 inch of rise per 12 inches of run to comply with accessibility standards.
- Affix sturdy handrails on both sides, extending beyond the ramp ends for added support.
Verification Step: Test the ramp by traversing it multiple times, confirming stability and resistance to slipping under various conditions.
3. Optimize Lighting for Clear Visibility
Inadequate lighting contributes significantly to accidents; address this by integrating reliable illumination throughout key areas. Install bright LED fixtures in corridors, restrooms, and cooking spaces to illuminate surroundings effectively.
- Incorporate motion-activated lights adjacent to staircases and doorways for automatic convenience.
- Upgrade traditional toggle switches to user-friendly rocker styles that require less dexterity.
Verification Step: Inspect each space for uniform brightness, eliminating shadows or excessive glare that could disorient users.
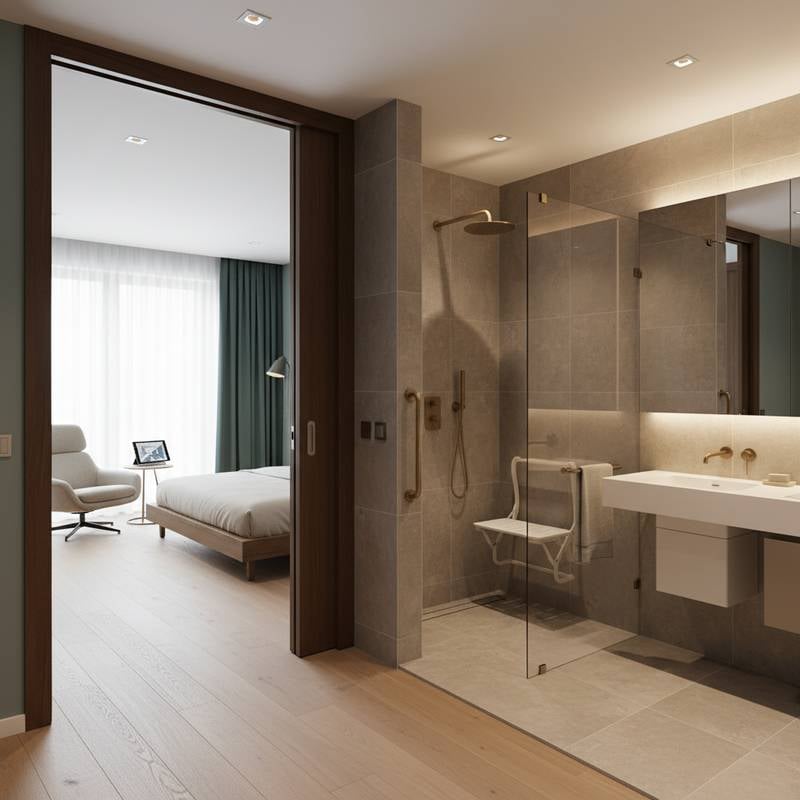
4. Retrofit Bathrooms for Enhanced Safety and Usability
Restrooms demand prioritized modifications due to their inherent slip and fall risks. Transform traditional setups into accessible havens with targeted upgrades.
- Convert standard bathtubs into low-barrier, zero-entry showers to simplify ingress and egress.
- Securely mount grab bars adjacent to commodes and within shower enclosures for reliable support.
- Select flooring with high traction coefficients to minimize slip potential.
- Adjust the water heater setting to a maximum of 120 degrees Fahrenheit, reducing scalding risks during use.
Verification Step: Simulate daily routines by entering, sitting, and exiting the shower area, ensuring no instability or hazards arise.
5. Customize Kitchen Spaces for Inclusive Functionality
Adapt cooking and preparation zones to support users of varying heights and abilities. Introduce flexible counter levels or adjustable surfaces to enable comfortable operation from seated or standing positions.
- Swap out round knobs for straight lever mechanisms on cabinetry and plumbing fixtures to ease manipulation.
- Relocate everyday essentials to accessible shelves positioned between 15 and 48 inches from the ground.
- Integrate pull-out shelving units and lazy Susans to extend reach without excessive stretching.
Verification Step: Perform common tasks like retrieving utensils or operating appliances, verifying that all actions occur without discomfort or overexertion.
6. Refine Flooring and Surface Transitions
Consistent, hazard-free flooring forms the foundation of safe navigation. Opt for materials that provide firm footing while reducing joint strain.
- Transition from plush carpeting to low-profile alternatives or resilient vinyl planks that offer better grip.
- Install flush or beveled thresholds at room boundaries to prevent stumbling.
Verification Step: Traverse all floor junctions and open areas, confirming a flat, even surface free from elevation discrepancies.
7. Reconfigure Bedroom Arrangements for Effortless Mobility
Streamline sleeping quarters to promote restful and independent routines. Rearrange furnishings to establish clear circulation routes.
- Position essential items like nightstands to maintain a 36-inch clearance pathway to the bed and exit.
- Install light controls within arm's reach from the bedside for nighttime accessibility.
- Consider adjustable bed frames that raise or lower to match user needs.
Verification Step: Navigate the room in low light, ensuring smooth passage to all points without obstruction.
Post-Installation Cleanup and Waste Management
After completing modifications, address debris systematically. Transport discarded items such as outdated plumbing fixtures, flooring remnants, or cabinet components to designated recycling facilities to promote environmental responsibility.
- Securely bag lightweight waste to prevent scattering.
- Clean newly installed surfaces with a soft cloth to eliminate construction dust and residues.
- Double-check connections for plumbing and electrical systems before reactivation; inspect for leaks or frayed wires prior to restoring water flow or power.
Final Inspections and Problem Resolution
Frequent Challenges and Solutions:
- Grab bars detaching from walls: Reinforce with metal mounting plates or install backer boards secured directly to wall studs for enduring hold.
- Persistent floor slipperiness: Treat surfaces with specialized anti-slip sealants or position removable mats in high-traffic zones.
- Inconsistent lighting distribution: Supplement with focused task lamps to brighten overlooked corners or work surfaces.
Quick Remedies:
- Reposition fixtures or increase bulb intensity to balance illumination.
- Renew deteriorated seals around exterior ramps and doors to maintain weather resistance.
- Inspect and secure any loosening fasteners throughout the installation.
Ongoing Care and Durability Expectations
Routine upkeep preserves the integrity of universal design features. Schedule biannual reviews of critical elements like handrails, inclines, and walking surfaces.
- Tighten all screws and bolts, replacing any corroded or fatigued components immediately.
- Maintain cleanliness using gentle, non-abrasive cleaners to protect finishes and traction.
- LED bulbs typically endure 25,000 hours of use; annually evaluate output to detect dimming.
- Reapply protective sealants to floors every few years, depending on wear, to sustain non-slip properties.
Indicators for Professional Intervention
Certain projects exceed DIY capabilities and necessitate expert involvement to uphold safety and code compliance. Seek qualified contractors for:
- Demolition or expansion of structural walls and enlargements of door openings.
- Comprehensive electrical upgrades, including new wiring or panel additions.
- Relocation of plumbing lines or specialized waterproofing for wet areas.
Estimated Project Expenses in 2025:
- Widening a single doorway: $700 to $2,500, covering labor and framing adjustments.
- Converting to a roll-in shower: $6,000 to $15,000, including demolition, tiling, and drainage.
- Complete residence accessibility overhaul: $30,000 to $75,000, tailored to home size and scope.
- Installing individual grab bars: $150 to $400 each, factoring in materials and secure anchoring.
Obtain a minimum of three detailed bids from reputable firms. Verify credentials through references, licensing verification, and proof of insurance coverage. Insist on breakdowns specifying labor, supplies, and waste removal fees.
Strategies for Efficient Execution
Maximize value by integrating complementary upgrades during the process. For instance, align doorway expansions with concurrent flooring replacements to minimize disruption.
- Lease niche equipment, such as wet saws for tile work or augers for drilling, instead of purchasing outright.
- Incorporate visual aids like contrasting edge colors on stairs and counters to improve spatial awareness.
- Vigilantly manage pathways, removing extension cords, loose mats, and accumulated items to sustain clear routes.
Universal design transformations foster a sanctuary of security and self-reliance. Through meticulous assessment and implementation, these enhancements equip your living space to adapt seamlessly to evolving needs, promoting wellness across generations.
Frequently Asked Questions
What defines universal design principles?
This methodology creates environments that accommodate individuals across all ages, physical conditions, and abilities, eliminating the need for customized alterations.
Can universal design modifications boost property resale value?
Indeed, features emphasizing accessibility and hazard reduction broaden market appeal, often yielding higher offers from diverse buyer pools.


