Understanding Wet Room Remodel Costs in 2026
Wet room remodels combine functionality with elegance, creating seamless, waterproof bathrooms ideal for accessibility and contemporary living. In 2026, homeowners can anticipate total project costs between $12,000 and $30,000, influenced by factors such as room size, material quality, and regional labor rates. These investments yield long-term benefits, including reduced maintenance and increased home resale value.
Key cost components include the following:
- Drainage and slope installation: $1,000 to $3,000, covering custom flooring adjustments to ensure efficient water runoff.
- Tiling and finishes: $3,000 to $10,000, varying with selections like porcelain, natural stone, or premium glass mosaics.
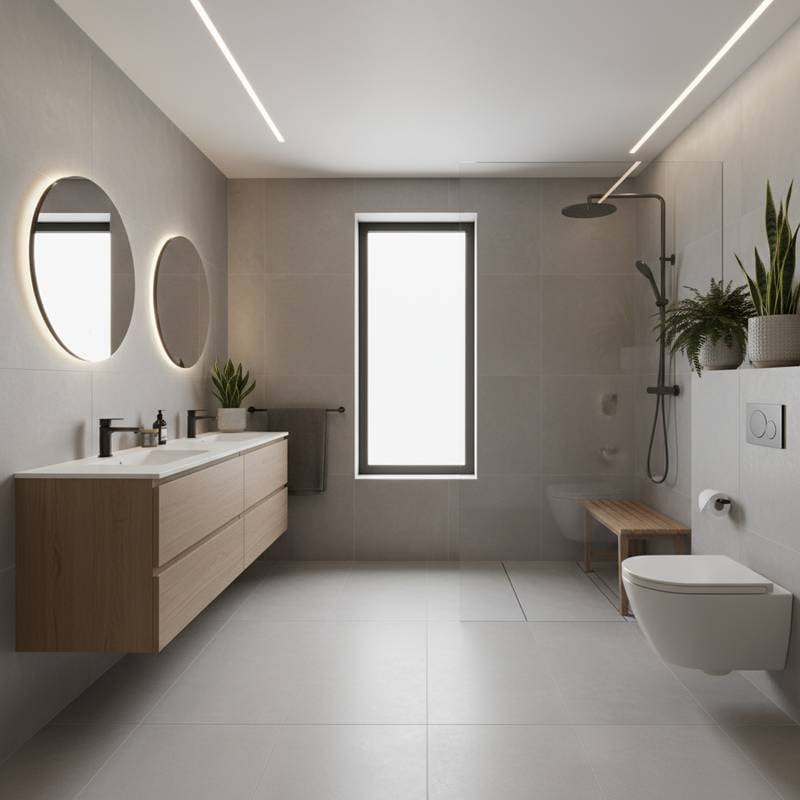
- Fixtures and fittings: $2,000 to $5,000, encompassing accessible elements such as curbless showers, reinforced grab bars, and height-adjustable sinks.
- Labor: $4,000 to $8,000, accounting for specialized plumbers, tilers, and waterproofing experts.
Additional expenses may arise from plumbing rerouting, electrical updates, or structural reinforcements, particularly in older homes. Budgeting requires a 10 to 15 percent contingency for unforeseen issues like subfloor repairs.
Project Timeline and Difficulty Level
Professional wet room remodels typically span 1 to 2 weeks, allowing for efficient coordination among trades. In contrast, DIY efforts extend to 2 to 3 weeks, factoring in learning curves and material sourcing delays. These timelines assume standard 60 to 80 square foot spaces; larger areas demand proportional adjustments.
The project carries an advanced difficulty rating due to the precision required in waterproofing, slope creation, and drainage integration. Novice homeowners risk costly errors, such as uneven slopes leading to water damage. Professional oversight remains advisable for optimal results, even in partial DIY scenarios.
Step-by-Step Guide to Wet Room Installation
Successful wet room creation hinges on meticulous planning and execution. The following steps provide a structured path, emphasizing safety and durability.
1. Plan the Layout
Begin by mapping positions for the shower area, toilet, and sink to maximize flow and accessibility. Design the floor with a gentle slope toward the central drain, preventing water accumulation.
- Allocate a minimum of 4 feet by 6 feet for unobstructed movement and wheelchair maneuverability.
- Locate drains at the floor's lowest elevation to facilitate natural drainage.
- Evaluate subfloor capacity to support added weight from tiles and membranes.
Verify that the design accommodates mobility aids, ensuring clear pathways and reachable controls.
2. Prepare the Subfloor
Strip away existing flooring to expose the subfloor, then assess for damage or irregularities. Repair or replace compromised sections to establish a stable foundation.
- Install moisture-resistant cement board or equivalent backer material for enhanced protection.
- Strengthen any weak spots prior to slope application.
Confirm the subfloor's levelness and integrity, as these elements underpin the entire waterproof system.
3. Install the Drain System
Select a linear drain for expansive coverage or a point drain for compact layouts, integrating it with current plumbing lines or modifying as needed.
- Conduct leak tests immediately after connections.
- Achieve a slope of at least 1/4 inch per linear foot directing water to the drain.
Simulate drainage by pouring water across the surface, observing flow without backups.
4. Apply Waterproofing Membrane
Employ a comprehensive tanking slurry or liquid-applied membrane to encase all vulnerable surfaces, forming an impermeable shield.
- Extend coverage across the floor and upward 6 inches on adjoining walls.
- Reinforce corners and seams with specialized waterproof tape.
- Allow full curing between layers, typically 24 hours per application.
Warning: Moisture Hazard Incomplete application invites structural deterioration over time. Scrutinize every joint for completeness.
The finished membrane must present a seamless, unbroken barrier against infiltration.
5. Tile the Floor and Walls
Opt for slip-resistant porcelain or stone tiles certified for wet environments, prioritizing durability and grip.
- Lay floor tiles outward from the drain, maintaining consistent slope.
- Secure with waterproof thin-set mortar and epoxy-based grout for superior sealing.
- Clean excess grout promptly to avoid haze on surfaces.
Inspect the tiled floor for uniform inclination, ensuring no areas prone to water retention.
6. Install Fixtures
Secure showerheads, valves, toilet, and sink using rust-resistant materials like stainless steel or chrome-plated brass.
- Position controls at seated height for accessibility, typically 48 inches from the floor.
- Integrate grab bars near entry points and fixtures, rated for at least 250 pounds of support.
Caution: Electrical Risk Incorporate GFCI-protected, damp-rated fixtures and position outlets beyond wet zones.
Test all installations for stability and leak-proof seals before finalizing.
7. Seal and Test
Apply high-quality silicone caulk along perimeters, transitions, and penetrations to fortify waterproofing.
Run water through the shower and fixtures for 10 to 15 minutes, monitoring for escapes.
No evidence of leaks, standing water, or moisture migration should occur post-test.
Troubleshooting Common Challenges
Even with careful execution, issues may emerge. Address them promptly to preserve integrity.
Pooling Water: Reassess slope accuracy and realign tiles if necessary, potentially adding shims under the subfloor.
Musty Odors: Examine membrane joints for breaches and reapply sealant where gaps appear.
Loose Tiles: Remove and replace affected units, then regrout with epoxy to restore adhesion.
Slow Drainage: Clear debris from the trap and verify pipe alignment for unobstructed flow.
Quality Assurance Checks
- Verify consistent floor slope promotes immediate drainage.
- Ensure grout lines remain flush and fully sealed.
- Confirm water containment within designated areas.
- Test fixture stability under applied loads.
These evaluations safeguard against future complications.
Maintenance for Longevity
A properly constructed wet room endures 20 to 30 years, provided owners adhere to upkeep protocols.
Routine tasks encompass:
- Drying surfaces post-use to inhibit mold growth.
- Clearing drains weekly with enzyme cleaners to prevent clogs.
- Refreshing grout seals every 2 to 3 years using penetrating sealers.
- Annual reviews of caulk for deterioration, with prompt replacements.
Monitor adjacent areas for unexplained dampness, signaling potential subsurface leaks requiring professional intervention.
Expert Recommendations
Enhance performance through strategic choices:
- Select oversized, textured tiles to minimize joints and improve footing.
- Incorporate hydronic underfloor heating systems to accelerate evaporation and deter condensation.
- Maintain grout lines under 1/8 inch wide to reduce seepage risks.
- Equip with adjustable handheld showerheads for versatile cleaning.
- Choose wall-hung sanitary ware to optimize floor clearance and ease of sanitation.
Such features elevate usability, safety, and visual appeal while simplifying hygiene.
Embracing Daily Benefits
A completed wet room transforms routine tasks into effortless experiences, fostering independence across life stages. The absence of thresholds and integrated safety measures reduce fall risks and streamline mobility. Consistent vigilance ensures sustained performance, delivering a sanctuary that appreciates in utility and worth over time.
Frequently Asked Questions
How much does it cost to convert a bathroom into a wet room? Costs range from $12,000 to $30,000, scaled by dimensions, finishes, and workforce involvement.
Can I install a wet room in a small bathroom? Affirmative, provided space measures at least 4 feet by 6 feet to accommodate essential slopes and drainage.
Do I need a permit for a wet room remodel? Permits prove necessary for plumbing alterations and electrical modifications, followed by official inspections.
What flooring is best for a wet room? Slip-rated porcelain or textured natural stone tiles offer optimal safety and resilience.
How often should I reseal the grout? Annual inspections suffice, with resealing required every 2 to 3 years to uphold waterproofing.
Is a wet room suitable for older adults or wheelchair users? Indeed, its level-entry design, combined with supportive elements, facilitates secure navigation.


